BY GINO ROBAIR
One of the toughest things about being a musician — and a drummer in particular — is finding a suitable place to practice.
Most of us end up being relegated to whatever unused space there is in a house, such as the garage, a spare bedroom, or even a closet. Failing that, many of us have to pay for rehearsal space. But in all scenarios, drummers need a place where they can play at full volume without disturbing others – a soundproof drum booth at home.
Intuitively you might think the soft materials we have around the house — blankets, egg crates, carpet remnants, mattresses — can be used to soundproof our practice room. The fact is that these items do nothing to keep the sound of your drums from reaching the outside world.
THE SOUNDPROOFING PROBLEM
As Rod Gervais says in his excellent book Home Recording Studio: Build It Like The Pros (Cengage, 2011),
“Forget about building ‘soundproof drum booth rooms — they don’t exist. Any assembly will let sound through — it just depends on the volume and frequency of the sound.”
Gervais is not only an engineer, he’s also a drummer, so he has first-hand experience in this topic as a player. (In the spirit of full disclosure, I edited the second edition of the book, but only after using it to design my own studio. I have no financial stake in it. However, of all the DIY books on studio building, this one is the most thorough.)
Unfortunately there is no quick, inexpensive way to get serious sound isolation.
You need to have airtight construction, lots of mass around the perimeter, and decouple the room from the rest of the structure. “Drums are difficult,” Gervais explained to me over the phone. “It’s not unusual for them to produce 110 to 120dB peaks, with a lot of low frequencies coming from the bass drum.
You’ll need to add a lot of mass to the room to isolate that level of sound. If you have a common 2 x 6 wall, you can add as much mass as you want, but you’ll still get direct sound transmission through the stud and through other flanking paths.”
Note that sound is not only transmitted through the air, but within the structure itself.
Solid surfaces are great at conducting sound over long distances. This includes the floor, whether it’s made of wood or concrete.
Consequently, you won’t solve the problem of sound transmission through a structure by simply applying room treatment to the ceiling, walls and floor. So what are those products for, anyway?
ROOM TUNING
The typical room in a house or office, especially if it has parallel walls, will resonate at specific frequencies, based on its dimensions. As a result, when music is played in the room, the resonant frequencies will sound louder than the others. You can experience this phenomenon for yourself by going into your bathroom and singing in the tub or shower stall: eventually you’ll find notes that resonate. The highly reflective surfaces in a bathroom make the resonance easier to hear than in other rooms.
Recording studios use acoustic treatment — absorbers, diffusers, and bass traps — to tame resonant frequencies in tracking and control rooms.
The idea is to create an accurate listening environment that has a balanced, reliable frequency response. While you probably don’t want to spend money making your rehearsal space acoustically flat, surface-treatment materials can help control the room’s reverberant characteristics in order to create a more pleasing environment in which to play.
For example, a practice space that has numerous hard, flat surfaces and parallel walls can sound overly live, often creating flutter echoes that are distracting.
Companies such as Auralex, Primacoustic, and RealTraps offer relatively inexpensive room-tuning kits, with a range of materials that can be applied to the walls and ceiling without altering the structure itself.
So when you see these products used in pro-studio environments, remember that they have little to do with soundproof drum booth. Sound isolation between rooms requires you to fully decouple one from the other, with each space being airtight.
DECOUPLING 101
Short of building a complete room within a room, there are things you can do to reduce the amount of sound that escapes your practice space. To do it right, however, requires some modification to the existing structure. If you’re renting an apartment, loft, or basement, or if you’re in a condo, you’ll want to get permission to do any serious construction.
In addition, you need to approach any structural work with caution, because increasing the load on walls, ceilings, and floors can be dangerous depending on the age of the building, the materials used, and where your room is situated. Getting the opinion of a structural engineer is a must.
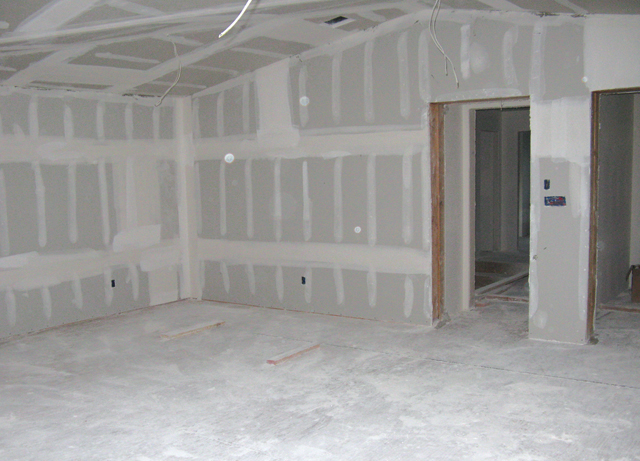
Simply layering more sheets of drywall on a pre-existing structure doesn’t effectively decrease a wall’s sound transmission.
Gervais’ first suggestion for increasing sound isolation is to decouple the sheetrock from the wall framing. That requires you to remove the existing layer of sheetrock, attach resilient channel to the studs, and hang a new layer of sheetrock from there. You can increase your sound isolation further by using RISC 1 (resilient sound isolation) clips, which decouple the clip from the stud using rubber isolators.
Next, you would attach hat channel to the clips, and hang the drywall from that.
At this point, you can add a second layer of drywall, with a sound-damping layer of Green Glue or Decibel Drop in between. Placing insulation, such as sound batt (a material with less density than standard fiberglass insulation) within the wall will add a bit more isolation. If you’re going through the trouble to expand the walls in this way, you’ll want to do the same with the ceiling. Otherwise, you won’t gain much in terms of mitigating sound transmission (Fig. 1).
You also need to consider the doors and windows in the room.
If they’re not sealed properly, sound will escape. While recording studios often have industrially built doors and windows, there are a number of books that show you how to build your own for a fraction of the cost.
When done properly, a sound-isolated room will be airtight, so you’ll need to figure out how to ventilate it. Again, a variety of DIY studio books show examples of ventilation systems that don’t compromise the isolation you’re trying to achieve.
ROOM WITHIN A ROOM
The next level of isolation comes from adding an air gap of at least 2″ between the walls and ceiling in your studio and the surfaces surrounding it (Fig. 2). At this point, you’re building a room within a room.
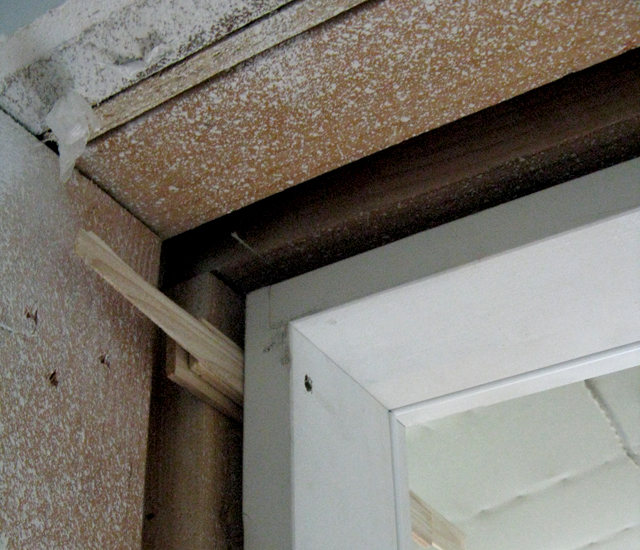
Although this approach can get pricey, it’s not as expensive as you might think, particularly if you or a friend are handy with carpentry tools. In cases where the room you’re planning to use will be a source of income, either through teaching or remote recording, it’s worth exploring the room-within-a-room concept.
At the high end are prefab systems, which include the same technology used for industrial-level sound isolation.
Omar Hakim chose this type of solution for his suburban New York loft, where he installed a 12′ x 16′ x 8′ “modular music room” designed by Industrial Acoustics.
The studio is large enough to hold his full kit, as well as a small recording setup and perhaps an extra musician or two. The design includes a floating floor, acoustic doors with magnetic seals, and a ventilation system, and it is quiet enough that he can play for hours without worrying about complaints from his neighbors.
And because the room is modular, he didn’t have to build anything into the loft structure itself. When Hakim recently moved to Brooklyn, his new space made this unit unnecessary, but it broke down and stored away relatively easily.
The DIY method, on the other hand, is practical in situations where you have the ability to modify the structure appropriately.
Berkeley-based drummer John Hanes took this approach when he dedicated one of the rooms of his house to a drumming booth for practicing and giving lessons. With the help of a contractor, he built a raised floor in it, where the joists sit in rubber, U-shaped vibration isolators on the pre-existing wooden floor. The riser is hollow and it doesn’t touch the walls.
“The inner walls have thick layers of sheetrock with sound board in between,” explains Hanes, “and there’s a 6″ airspace between the inner and outer walls.
We installed two doors. The inner door is a metal, industrial-insulated door — fairly soundproof drum booth. There are a few inches of airspace, then the outer door. That second door makes a huge difference” (Fig. 3).
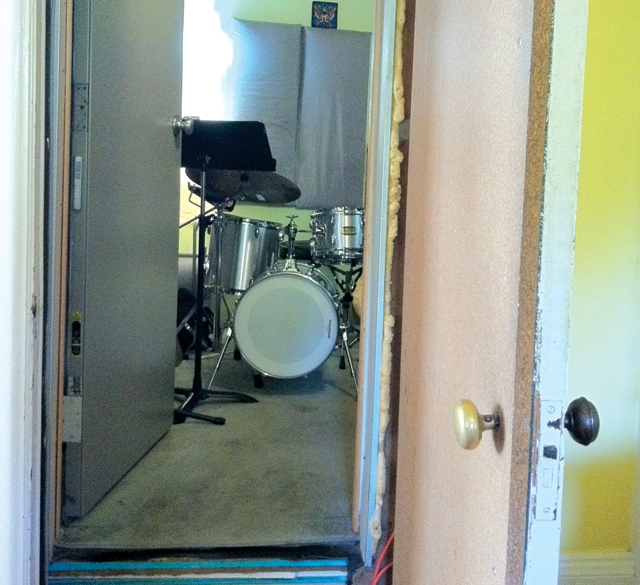
Hanes spent about $4,000 on the project. And while the results in this roughly 10′ x 10′ room aren’t perfectly soundproof, he feels it is a major improvement.
“The low end is not completely isolated, and out in the house you can hear the muffled sound of someone drumming.
However, when I close both doors, I can’t hear my wife giving voice lessons,” he says with a laugh. More importantly, he can play as loud as he wants and it doesn’t disturb the neighbors next door.