From DRUM! Magazine’s July 2017 Issue | By Andy Ziker
No one at Mesa Community College, where I was a student in the late ’80s, would have guessed that I’d someday become a professional groove analyst. I was an inexperienced drummer with raw skills and very few concepts under my belt, but I somehow convinced the semi-retired Don Bothwell — who was known as the Yoda of drumming and whose star pupils include Dan Tomlinson, Dick Weller, and Peter Magadini — to give me lessons. Bothwell’s instruction was intense (in a good way). One day, he surprised me with an unusual task: Transcribe 16 bars of a Philly Joe Jones drum solo. I intuitively knew this would be worthwhile, but though I completed the rest of my lesson work that week, I blew off doing the assignment. I still feel guilty about this and realize what a great opportunity I missed.
As soon as I began teaching private lessons, I noticed my students were much more engaged when they played along with their favorite recordings. Transcribing parts for them not only made learning fun, but also gave them a foothold on understanding rhythm and song structure. Through trial and error (a lot of error), these homemade charts became more and more accurate, and eventually helped me to write drum books and articles.
Looking back at this voyage, I realize that transcribing is a win-win proposition: Not only can you help others gain fluency and understanding by better communicating about the art of drumming, but as you transcribe, your own playing improves dramatically. Learning by ear (or feel) is of course invaluable, but writing down the notes can fine-tune your ears to an even higher level, as it combines visual, auditory, and kinesthetic learning modalities. After many hours of practice, you begin to see notes fly by in real time as you play, and can later jot these down at your convenience. This is a big benefit in coming up with your own parts.
Prerequisites
When you sit down and begin transcribing, you may find it more difficult than you expected. The following building blocks should ideally be in place before you jot down your favorite drumming.
- Listening. You need to be able to recognize, pick out, and isolate instrumentation (guitar, bass, keys, hand percussion, drums, etc.) in a song.
- Experience. It helps to be familiar with multiple genres of music and to have had some experience playing live and in the studio. This way you can better trust your intuition when drum parts are not easily discernible.
- Patience. Like solving a puzzle, this activity isn’t something that you can normally do quickly or casually.
- Reading & Writing. Take a look at the reference guide called “Guide To Drum Notation” (by Brad Schlueter). If any of this looks unfamiliar — including information on notation key, bar lines, note values, repeats, and more — you may want to invest in lessons with a drum teacher.
Note: Drum tabs have become a popular way to communicate beats and fills. Unfortunately, tabs can be hard to decipher because they lack symbols (note-heads and beaming), which allow our brains to form mathematical connections. If you’re already halfway there in using tabs, you might as well take it to the next level.
Pencil To Software
My own penmanship is a little on the sloppy side when using pencil on blank staff paper. Exercises need to be legible for students, so I acquired notation software called Finale (Sibelius is another popular option). Though I suffered through the typical steep learning curve of absorbing such a powerful program, it may have been one of the best buys I’ve ever made. Not only does Finale make your work look more presentable, but it can also plug holes in your rhythmic understanding, allow you to add details (articulations, repeats, dynamics, etc.), and give you a chance to check your work with playback features.
Note: Not only have recent versions of Finale and Sibelius become dramatically more user-friendly, but the appearance of tablet devices such as the iPad Pro have led to specially designed apps — such as StaffPad and Symphony Pro — where users can use a stylus to magically turn handwriting into typeset notation.
Style
Notation apps — similar to word processing software — give you a choice of fonts for both notes and text. In addition to this fairly straightforward decision come two more controversial ones: stem direction and note-head location.
- Stem Direction. Drum Magazine uses all stems pointing up, while other publications use stems up and down. Each has its advantages. Stems-up has a clean and elegant look and presents the drum kit from a holistic perspective. Readers only have to be concerned with one set of rhythms (including rests). Stems-up and -down allows you to easily separate out parts of the drum kit (bass drum from snare/hi-hat, for instance).
- Note-Head Location. Although most publishers place note-heads in the exact same positions, there is one main exception: The hi-hat and ride cymbal (symbolized with an “X”) positions are often interchanged (above or through the top line). There is also little agreement on symbol/position for less-played parts of the drum kit: cowbell, China, splash, etc. Drum uses one note-head position (line above the top line) to symbolize crashes. This a very helpful practice, as it can be agonizing to decipher one crash from another in multiple cymbal set-ups.
Articulations include the many details that brings drum parts to life, including accents, ghost notes, buzz strokes, crescendos, and many more. While many of these articulations come with associated symbols, others don’t. This is when you have to get creative, either coming up with your own symbols or adding descriptive text to the notation.
When transcribing an entire song, it’s beneficial to keep the score as short as possible, so that when printed out, it can fit on a music stand. This is accomplished by using repeats and navigation markers (D.C., D.S. al coda, etc.) whenever possible and avoiding add-on details such as chord progressions, lyrics, and vocal melodies.
Spacing is key in making your chart look as good as possible. Pay close attention to: number of lines (staves) per page (which is a fixed amount with pencil on manuscript paper), number of measures per line, and the spacing within one measure (too many notes causes clutter, and unequal spacing can cause confusion).
Time signatures are another point of contention. One person’s 3/4 can be another’s 6/8. The notation for double-time or half-time feels is not standardized. Your best option is to formulate time signatures and group notes in a way that is familiar and makes sense to the most drummers. Consider the following:
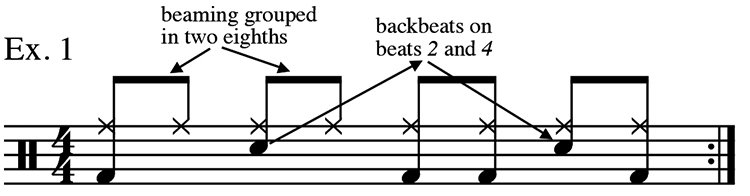
- Backbeats normally appear on 2 and 4 in 4/4 time (Ex. 1).
- Rock/funk beats are easier to read when hi-hat eighth-notes are beamed two notes at a time (Ex. 1).
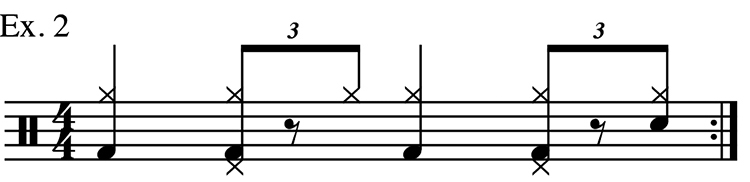
- The jazz ride is normally written as part an eighth-note-triplet flow (Ex. 2).
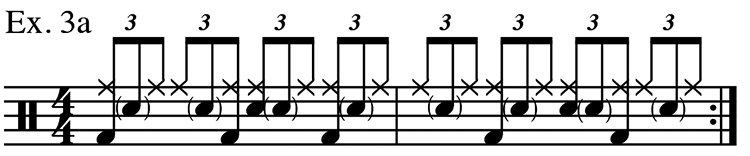
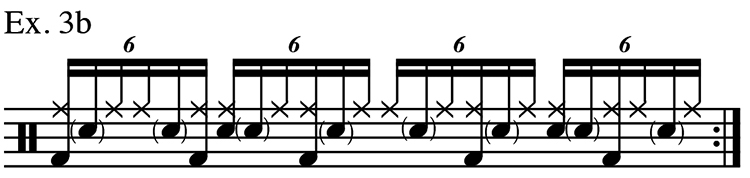
- Half-time shuffles can be conceived as eighth-note-triplets with the backbeat on 3 or sextuplets with the backbeat on 2 and 4 (Ex. 3a and 3b).
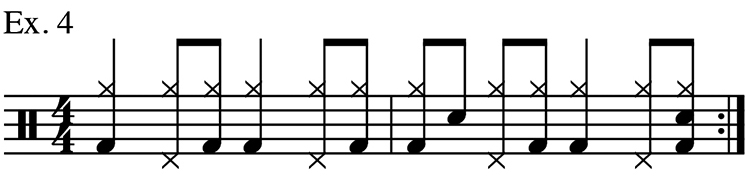
- The Brazilian foot ostinato in 4/4 includes bass drum on 1, (2) &, 3, (4) & (Ex. 4).
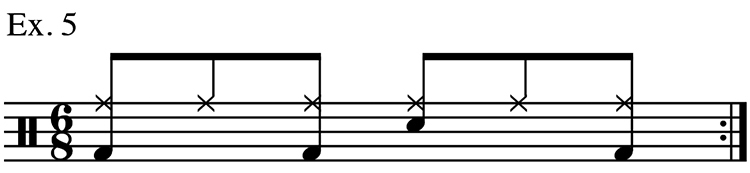
- 6/8 (or 12/8) ballads or slow blues are normally built off the bass drum on 1 and the snare on 4. Beaming is best grouped three eighth-notes at a time (Ex. 5).
Other Tools Of The Trade
Besides notation software, these additional tools will make your life a lot easier.
- Metronome. Part of the transcriber’s job is to determine the bpm (beats per minute). Any metronome with a tap function lets you determine the tempo by tapping along with the pulse. I highly recommended an app called Tempo for this purpose.
- Slow Downer. This software (I use The Amazing Slow Downer for my laptop and Mimi-Copy for my phone) enables you to slow down or speed up music without changing the pitch or the sound of the drums. This way you can still identify disparate parts of the kit when changing tempos. These programs also come with looping capabilities and graphic equalizers (consider using the Slow Down Type IV setting from the equalizer drop down menu), both of which are indispensable.
- Headphones. This may seem obvious, but acquiring a quality pair of headphones (or monitor speakers) is an absolute must. I keep my listening environment consistent by using the same brand of headphones, Sony MDR-7506, for transcribing, teaching, and session work.
Okay? Let’s Go!
The following examples — with helpful hints included — will get you started. The audio samples are from Jed’s A Millionaire’s recently released EP, Time To Shine. I played drums on the album, so the provided notation is 100-percent correct (which is rarely provable in the inexact world of transcribing). Formatted just like a math book, it has the answers placed right after the text. Find a quiet place, sharpen your pencil, and let’s get to work. If you don’t try this now, you’ll regret it later.
“You Are Not Alone”
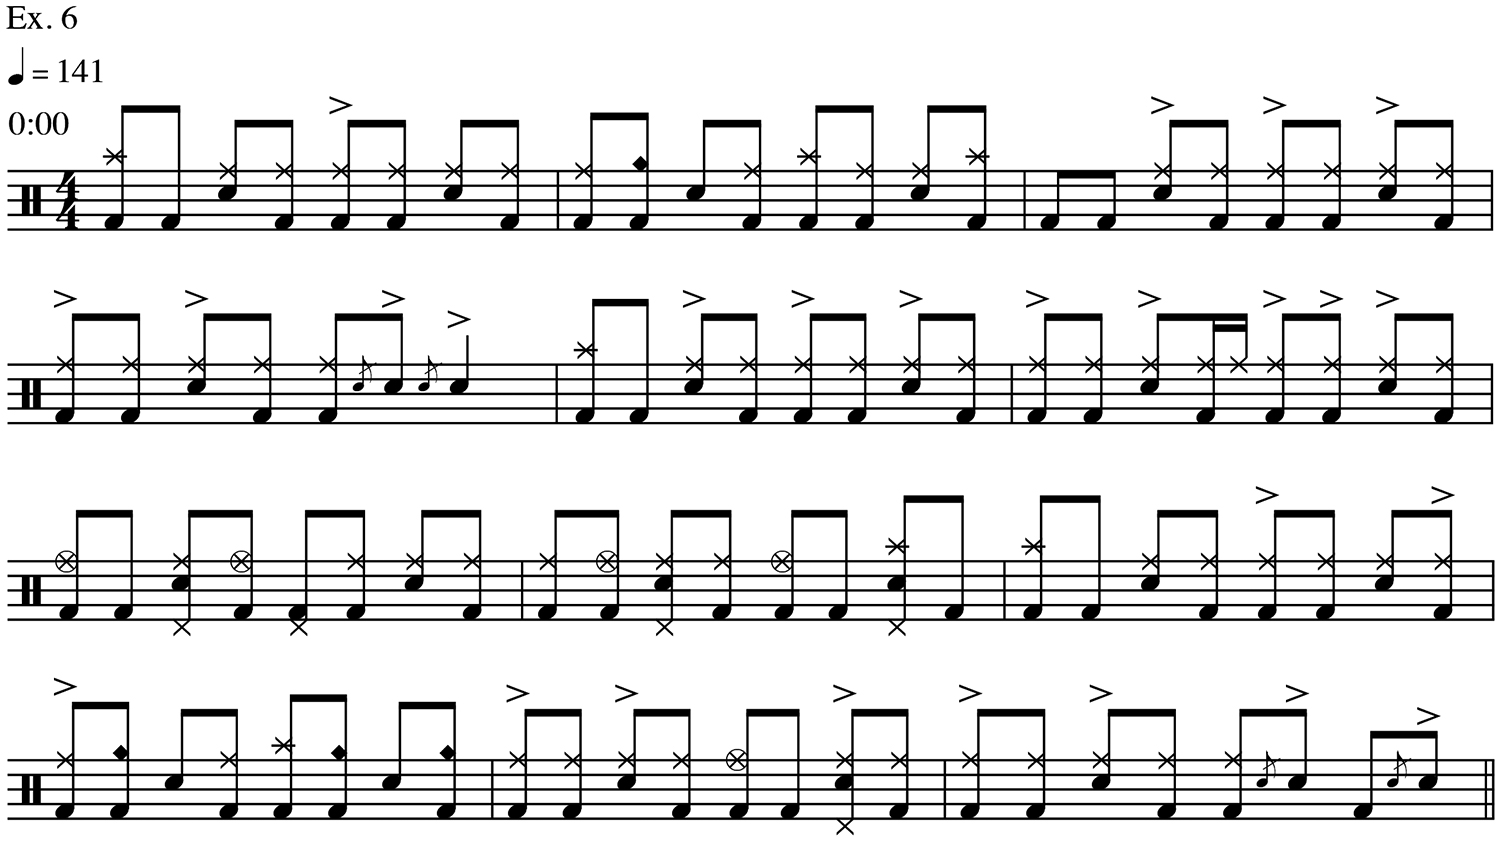
Ex. 6 (0:00): This introduction is 12 measures long (first four are drums only), so it makes sense to distribute four lines with three measures in each line. Squeezing 12 measures into three lines is possible, but would look cluttered.
Using the tap function on your metronome, place the tempo and time stamp (0:00, in this case) in the upper left corner above the time signature in the first measure. At first, set your slow downer to 80 percent of the original, but feel free to alter the speed to suit your own ears. Using the equalizer, boost the highs, bring down the low mids, and slightly boost the lows. However, to really hear the nuances played by the hi-hat, you may need to boost the highs and drop all other frequencies.
Start by notating the driving, continuous eighth-note bass and snare ostinato. Next, focus on what the right hand is doing, as it moves between hi-hat, crashes, and bell of the ride. Pay close attention to the open hi-hats in measure seven, eight, and eleven (including where they close), and the power flams in measures four and twelve. The double bar line at the end of the eighth measure represents the end of a section.
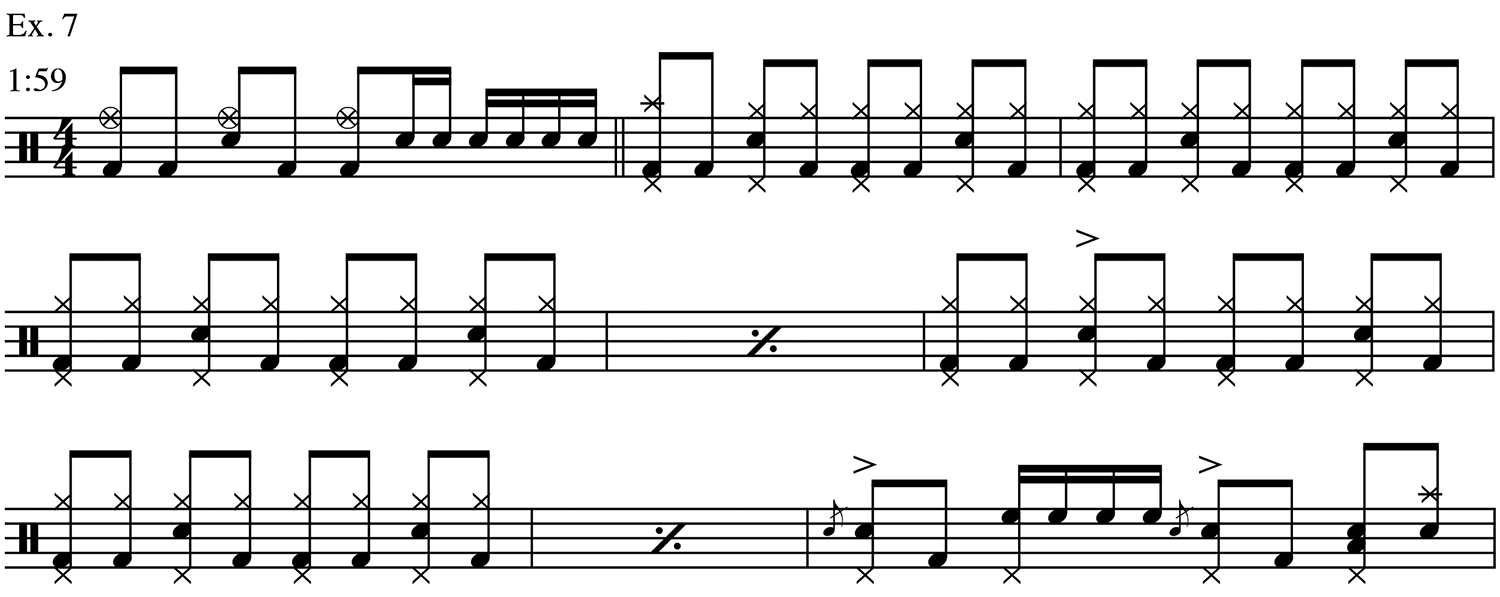
Ex. 7 (1:59): In the measure before the bridge, slightly open hi-hat quarter-notes lead into a six-note, sixteenth fill on the snare. The driving pattern between the bass drum and snare continues as before, but this time the right-hand plays on the ride. Quarter-note hi-hat chicks can be faintly heard when you crank the highs on your equalizer. These become more obvious during the one-measure fill in measure nine. Did you check to see if you got the fill right?
“Sheeps A Wolf”
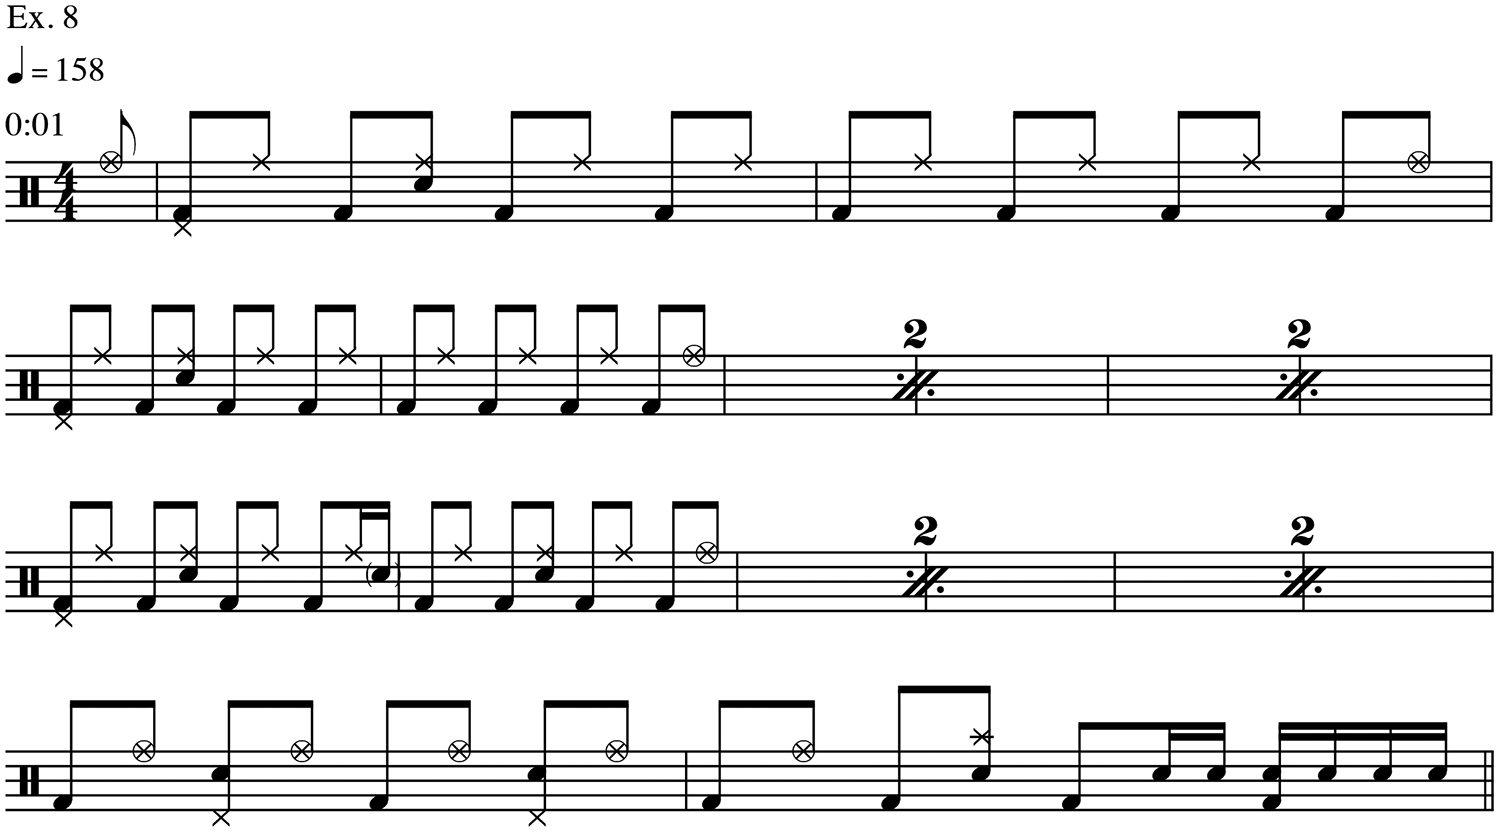
Ex. 8 (0:01): After a stick click count-off (not notated here), an open hi-hat is shown as a pickup note leading into the first verse. (A pickup is part of a measure that leads into the downbeat of the first bar.) The verse beat involves four-on-the-floor bass drum and mostly off-beat closed hi-hat (with an open hi-hat at the end of each two-measure phrase). The snare isn’t located in the typical backbeat position. It’s used sparingly at first (once every two measures), and then increases in frequency as the section builds. In measure nine, a ghosted snare on the ah of 4 becomes part of the pattern. Listen to how the open hi-hat in bar 15 doesn’t close, which allows the resonance to overlap into the sixteenth-note fill.
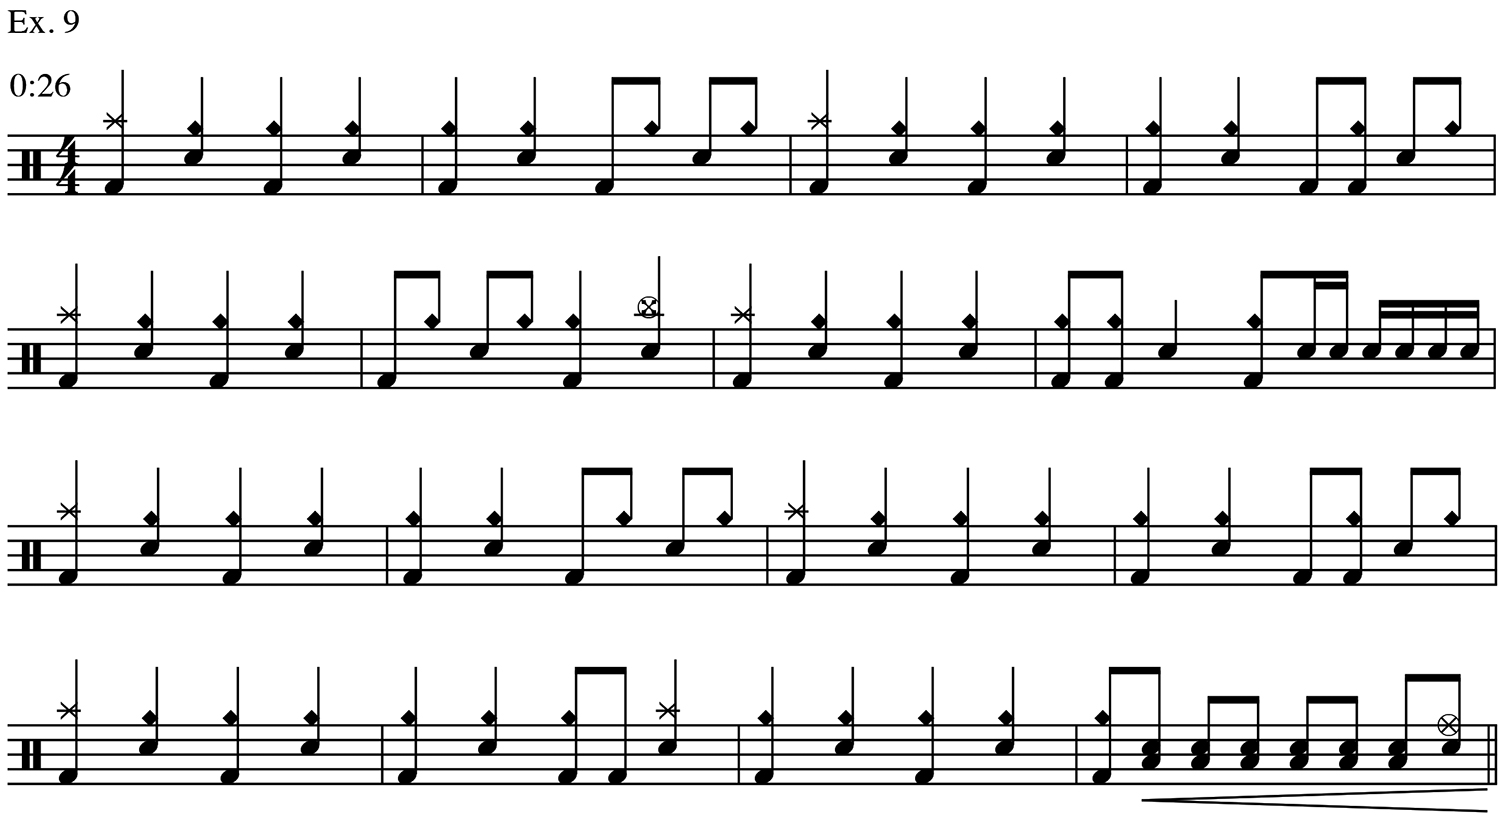
Ex. 9 (0:26). The drumming in the chorus is fairly simple, so you can set the tempo in your slow-downer somewhat close to the original. (Try 70 percent.) The challenge is distinguishing one drum sound from the other. Some of the ride bell sounds are masked by the bass drum or tambourine eighths, while crashes are somewhat covered up by downbeat power chords on distorted guitar. To make it easier to discern these parts from one another, use your equalizer to turn up the highs and crank down the lows.
Ex. 10 (1:50). This nine-bar excerpt comes from the middle of an instrumental interlude. In the first six bars, fast sixteenth-notes on open and closed hi-hat add interest and momentum, but are difficult to establish. When you slow down the tune to about 45 percent and lift the highs, it becomes easier to hear what’s going on, but the tambourine sixteenths become a distractor. Can you hear the hi-hat accents? Where are they located?
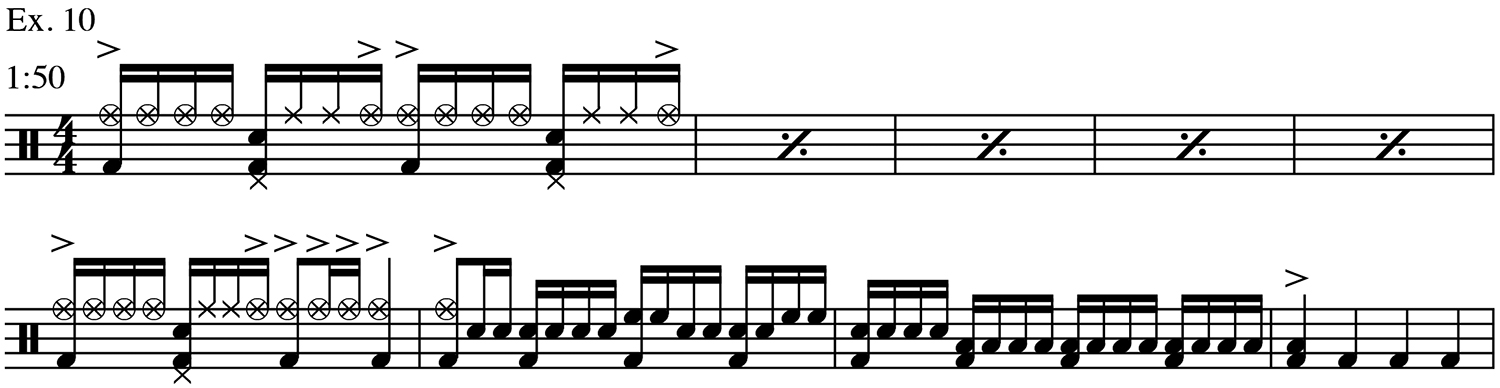
Transcribing fast fills involving toms, such as the one found in measures seven and eight, can be quite a challenge. Determining the number of toms, dealing with overlapping resonance, and distinguishing one tom from the other are the key issues to overcome. While sixteenths move between snare, high tom, and floor tom, the bass drum continues pumping out four on the floor. To best identify this fill, set the speed to 30 percent and turn up the lows and midrange frequencies. This is the moment when high quality headphones really become valuable.
“Time To Shine”
Ex. 11 (1:14). At 65 bpm, it may not be necessary to slow this song down at all. “Time To Shine” is an unusual song because it is through-composed. In other words, the verse melds into the chorus without an obvious breaking point. Here, the first three measures are shown as the end of the verse, but could easily be conceptualized as the beginning of the chorus (especially when considering lyrical content). Though not complicated, the drumming is expressive to match the emotions of the vocal melody. The slow funk groove and repeated ensemble hits (measures three and seven) use swung sixteenths, sloshy hi-hat crescendos occur at the tail end of each mini-phrase, and to set up the bridge, the fill in the last measure is straight, not swung.

“Looked Into The Sun”
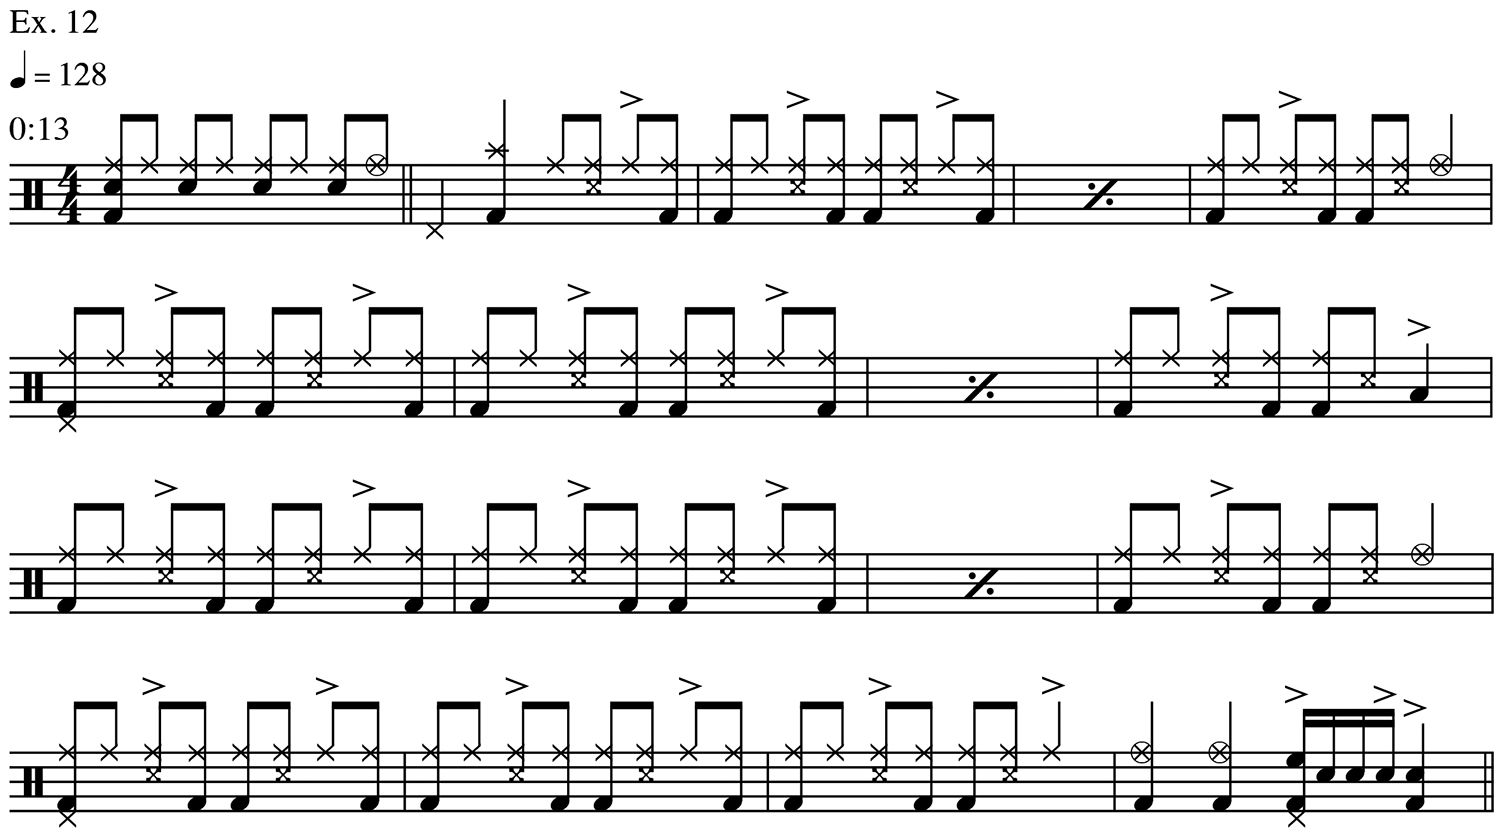
Ex. 12 (0:13). This is a fun tune to play, because it lends itself to playing beats from different genres. The first measure included here is the last measure of the introduction, and uses four quarter-notes on the snare (often found in Motown grooves). An open hi-hat leads into a one-beat stop and a Brazilian-influenced verse pattern with repetitive rim-click based on the clave. Eighth-notes on the shaker obscure the hi-hat part, but when you increase the highs on your equalizer, this becomes much easier to hear. (Also, listen closely for the placement of closed hi-hat accents.) To uncover the four sixteenth-note fill in the last measure (also influenced by Motown), slow the passage down to 50 percent, turn up the low-mids and mids, and turn down the highs.
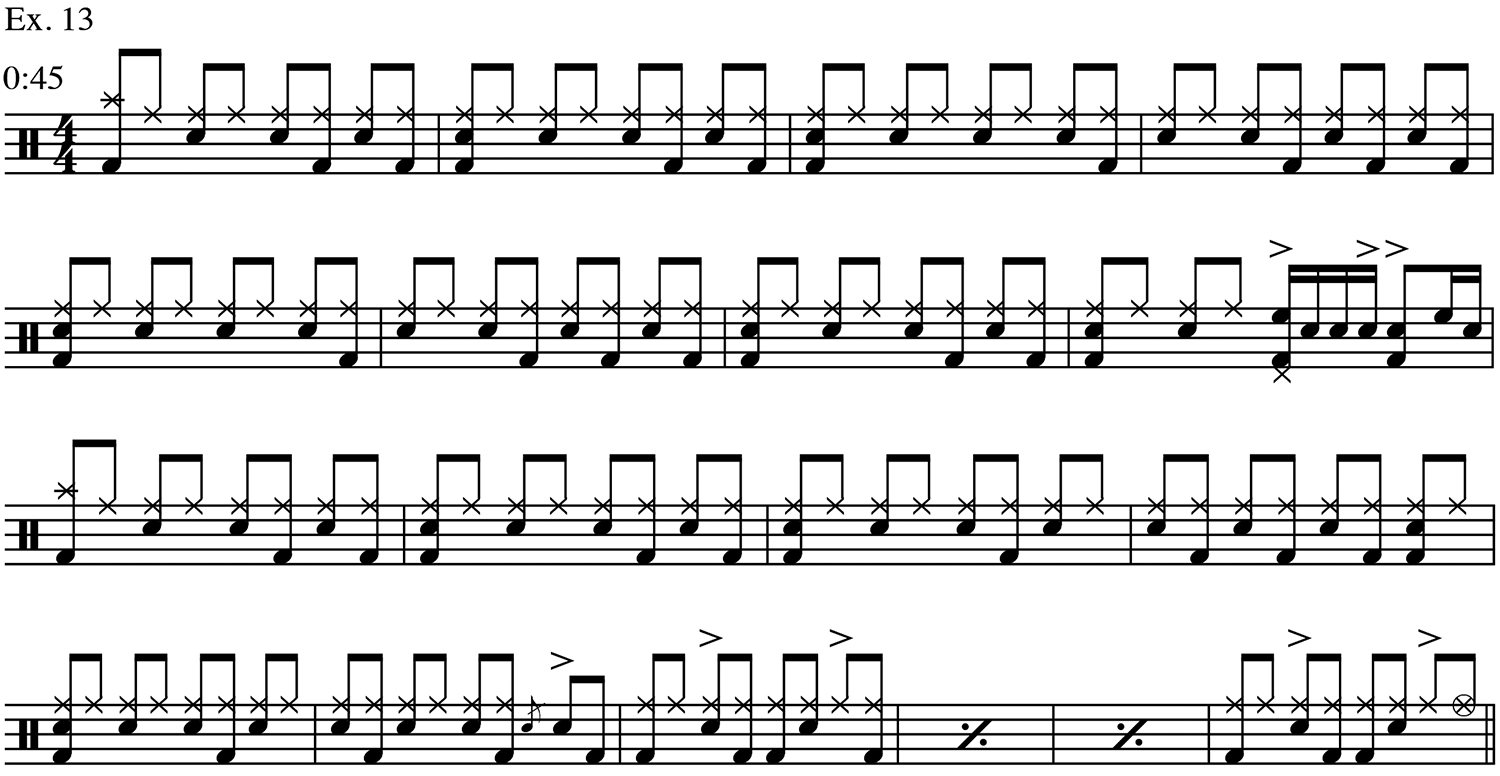
Ex. 13 (0:45). The ostinato in the chorus is between closed hi-hat and four on the snare. The snare is hot in the mix, while the hi-hat is buried. To hear what the hi-hat is doing, turn the mids and high-mids down and raise the highs. The bass drum varies from measure to measure as it reacts to the vocal melody, until a power flam on beat 4 brings us back to the repetitive Brazilian foot pattern from the verse. Snare is used here instead of rim-click.
“When You’re Down”
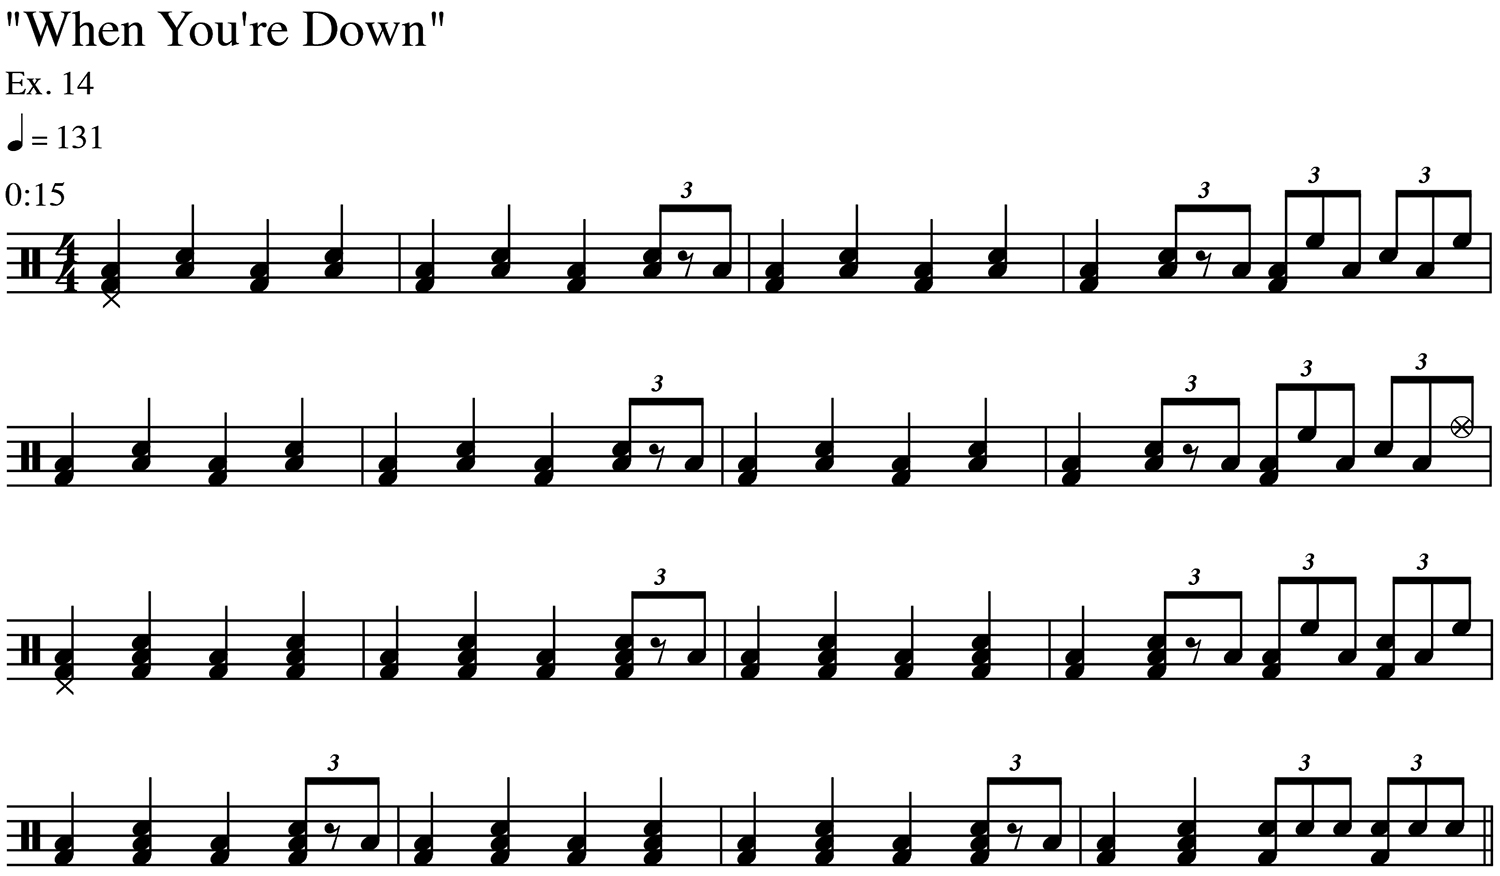
Ex. 14 (0:15). This shuffle was notated using eighth-note-triplets instead of swung eighth-notes because of a repeating triplet lick (on floor tom, snare, and high tom) at the end of each of the first three lines. Whenever possible, rhythmic continuity — throughout a section or even an entire song — can make the notation much easier to read.
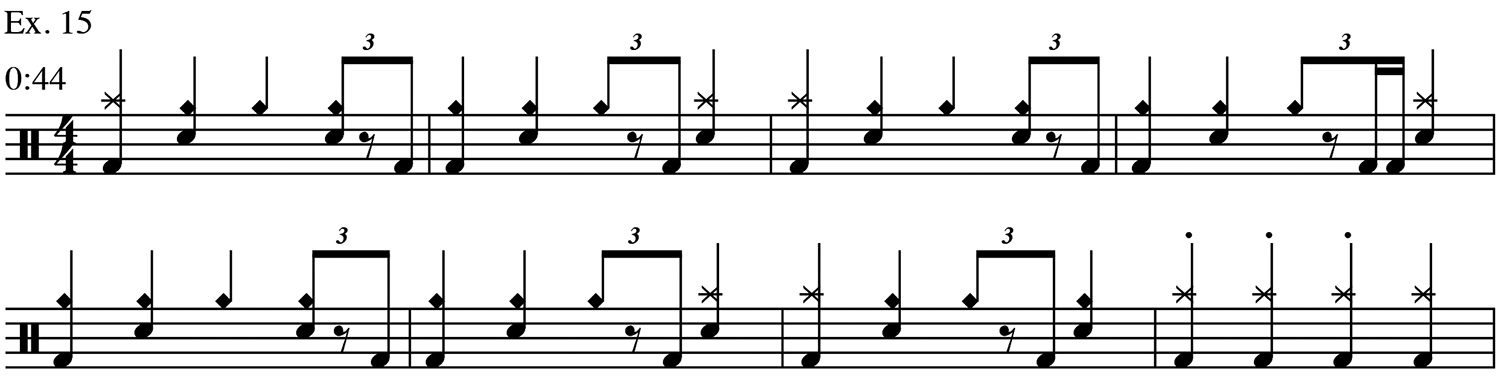
Ex. 15 (0:44). The shuffle feel continues, but is now orchestrated between ride bell, bass drum, snare, and crash. Again, use your equalizer to find missing sounds. Refer to the “Guide To Drum Notation” to learn how to notate choked crashes.
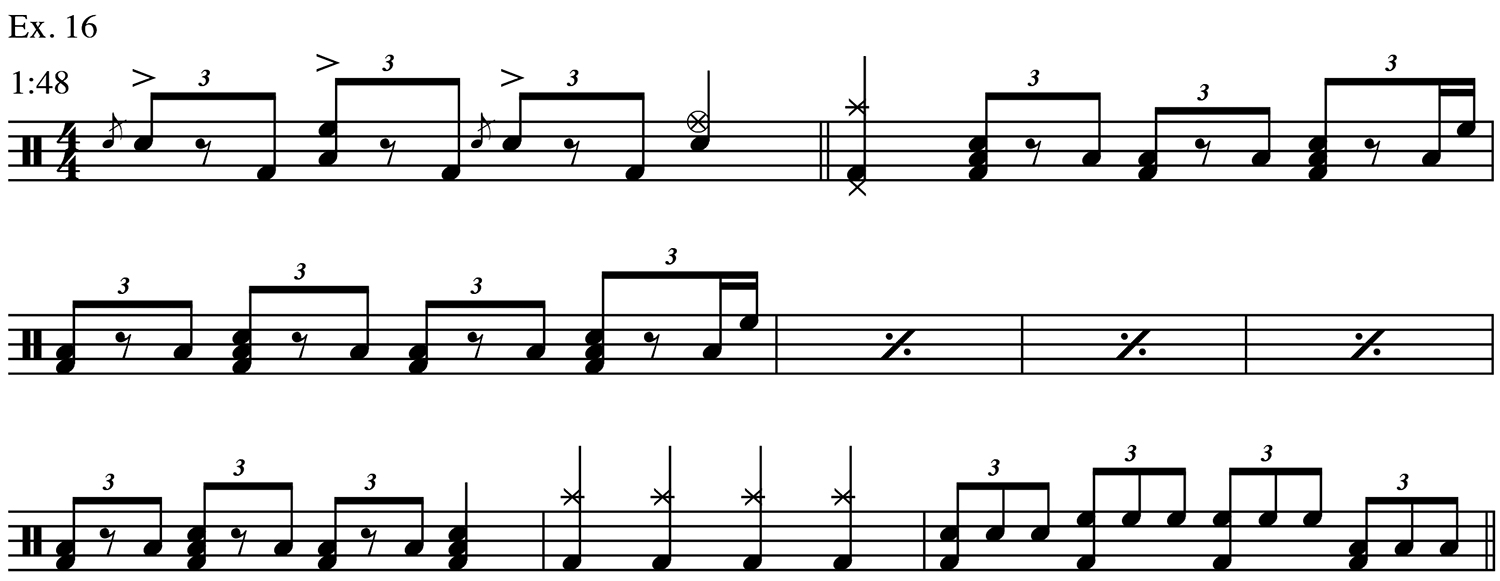
Ex. 16 (1:48). This excerpt begins with a one-measure fill moving from the second chorus into the bridge. With a walking bass line competing with the roar of the floor tom and high tom, it’s difficult to identify the two sextuplets located on the last eighth-note triplet of measures two through six.
For More Information
The mission of learning to transcribe wouldn’t be complete without adding two excellent volumes to your percussion library. In The Art Of Transcribing: Drum Set, Book 1, author Alan Schechner establishes an extremely effective routine. Each page introduces a rhythmic seed. By listening to the accompanying audio examples, you place these seeds into groove and fill templates that use duplets (eighth- and sixteenth-notes) and eighth-note triplets.
The workbook-style format (blank space/empty staves) is paired with answers found in the back of the book. Schechner’s audio comes with drums only. Without the distraction of other instruments, this makes for a great first step in improving your listening skills. More transcribing goodness can be found in Book 2, where you will learn to notate thirty-second notes, sextuplets, and additional voices on the drum kit, as well as transcribe more complex styles including jazz, world, and odd time signatures.