From DRUM! Magazine’s September 2017 Issue | By Rick Van Horn | Illustrations By Juan Castillo
Today’s technology has produced a number of terms that are hybrids of words used in science, industry, academics, and so on. Among those that I find most interesting is the word “ergonomics.” Simply put, ergonomics is the relationship of the human body to work. This includes the physics of motion, mechanics, and the design of physical objects, like tools and equipment.
Over the years I’ve given a lot of thought to the relationship between a drummer’s body and his or her drum set. I’ve had occasion to speak to some highly expert medical people on the subject. And I’ve received correspondence from drummers all over the world describing physical problems that they were having. After adding some past experiences of my own to this mix, I’ve come to the inescapable conclusion that drummers need to be more concerned with ergonomics than do any other instrumentalists.
Let’s face it: The drum set is the most personal instrument in the musical pantheon. A keyboardist can sit down at any piano and play it. Likewise, a guitar player can pick up any six-string and strum a chord. But a drum set must literally be constructed around the person playing it. And if that construction isn’t a “perfect fit,” the result can be impaired playing ability, reduced comfort, and even physical injury. So let’s take a moment to evaluate the relationship of a drummer’s body to a drum kit, and examine a few points that you might not have considered when creating your current setup.
Physiology & Seat Height
Ergonomics are of the greatest importance to a drummer when it comes to the question of seat height. Of course, “correct” seat height is determined by many factors, all of which vary with the individual player. For years drummers have argued over whether one achieves more power by sitting high or low. Questions regarding speed and control also become part of this issue. But there are certain physical factors that should be taken into account when you’re in the process of determining what seat height is best for you. (And even if you’ve been playing for years, it’s a good idea to take a fresh look at this critical element of your setup.)
In addition to the considerations mentioned above, think about your body’s need for unrestricted circulation. The edge of a seat positioned too high can cut into the undersides of the thighs, pinching major blood vessels and causing numbness in the lower limbs. A seat that is too high can also cause upper and middle back strain (due to the legendary “drummer’s slouch” that it promotes), while a seat that is too low can cause lower back problems from putting most of the upper body’s weight on the lower spine. Finally, a seat that’s too high or too low can cause the body to move in unnatural ways in an attempt to remain balanced.
While I can’t recommend one specific height for everybody, I can suggest an exercise that may help you to understand how seat height relates to your playing. Sit on a standard dining-room chair. Pull your feet back as far as possible under the seat, keeping them flat on the floor. Now try to play an imaginary bass drum pedal. It’s virtually impossible, right? This is an extreme example of the knee-ankle-foot angles that are created when you sit very low. Next, put your feet out in front of you as far as they’ll go — again keeping them flat on the floor — and play your imaginary pedal. The extensive range of motion you now have reflects the angles that are created when you sit higher.
With all of the above in mind, I suggest that you sit at your drum kit and objectively evaluate whether you might benefit from a change in seat height. Just remember to make any such changes in small increments at a time, and mark your starting point so you can return to it if you’re not happy with those changes.
Anatomy & Bass Drum Position
Next, let’s look at the relationship of a drummer’s body to the position of his or her bass drum, which is usually the starting point for any drum kit setup. We’ve all been brought up on photos of drummers sitting proudly behind their kits, with their bass drums facing straight forward so that the illustration on the front head (be it a company logo, the drummer’s initials, or the band’s name) is clearly visible. The drummers themselves are also faced directly forward so we can see their smiling faces. What’s wrong with this picture?
Most drummers see nothing wrong with it, and that’s the way they set up: drums and drummer both facing straight ahead. But if the bass drum is facing straight ahead, that means that the bass drum pedal is pointing straight back. This creates a need for what I believe is an unnatural “turning in” of the bass drum foot.
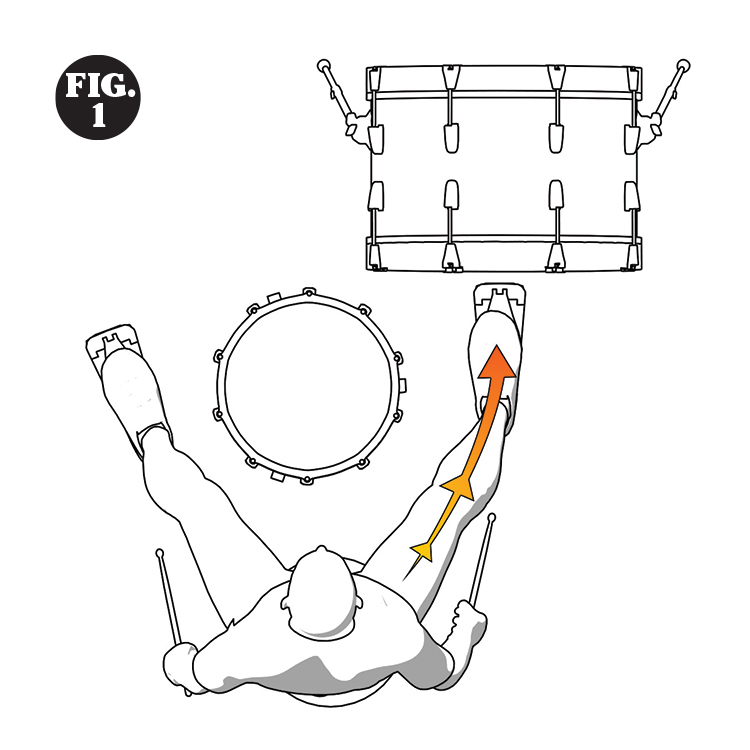
The human body is designed to operate in a very limited number of ways. It has remarkable flexibility within those parameters, but cannot endure extended abuse without some reaction — usually in the form of injury or impaired performance. And when it comes to your thigh, knee, calf, ankle, and foot, they all work together best in a straight line. Twists and turns cause problems (Fig. 1).
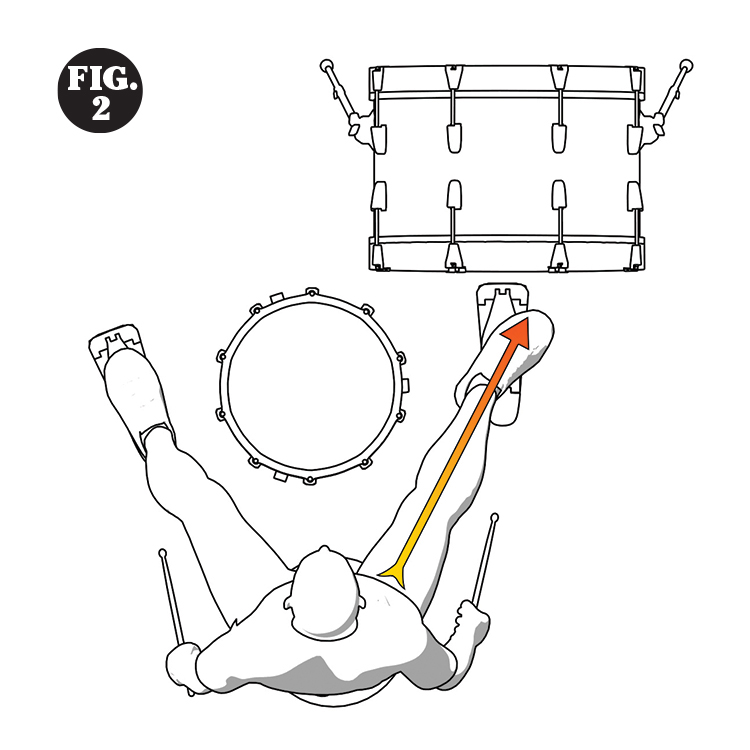
Some drummers try to get around the nonaligned foot-to-pedal situation by setting the bass drum facing straight forward, but letting their foot angle naturally across the pedal plate instead of turning it at the ankle to correspond to the pedal. While this may reduce the risk of problems for their bodies, it likely will increase the risk of damage to the hinges and linkages of their pedals, which were not designed to withstand “sideways” stresses (Fig. 2).
Take a moment to do another exercise: Sit in a reasonably high, straight-backed chair (or on your drum stool if it’s handy). Close your eyes, relax completely, and imagine that you have a snare drum on a stand in front of you. Lift your legs so that your feet are off the ground a couple of inches. Now, while remaining totally relaxed, let your feet drop to the floor. You should notice that your feet will land with the toes slightly turned out — usually at close to a 45-degree angle.
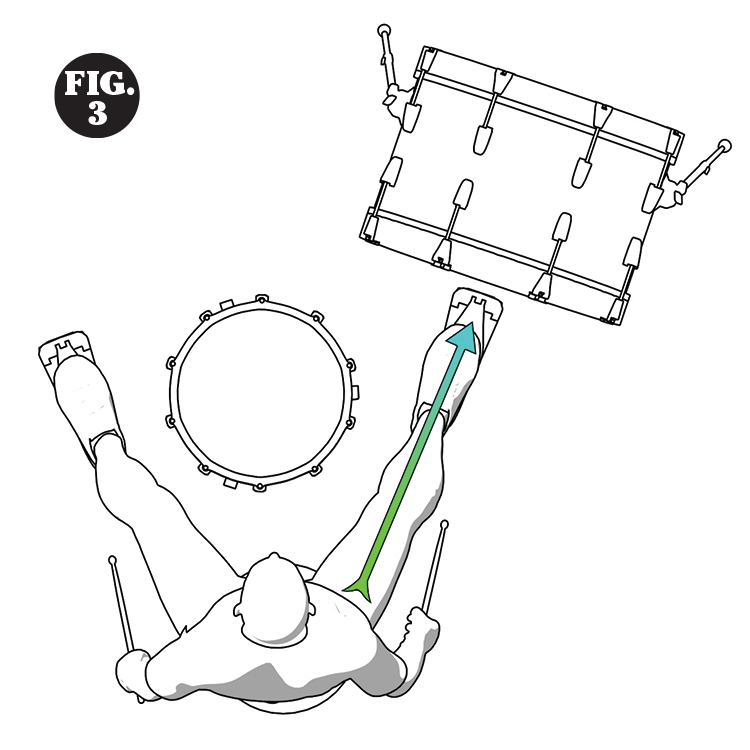
It’s my contention that in order to maximize strength, speed, and stamina (and to minimize potential injury to your knee, calf muscles, and ankle), the angle of the bass drum pedal should conform to the angle of the foot — not the other way around. This means that if you wish to face straight forward, the pedal should angle slightly to the outside of your body (left or right, depending on which foot you use). The bass drum itself should be offset accordingly. Just visualize how a bass drum would be placed in a double-bass setup, and you’ll get the picture (Fig. 3).
Obviously, if your rack toms are mounted on your bass drum, offsetting that drum is going to move the toms over as well. But this needn’t be a problem. There’s an abundant variety of drum hardware available to help you put the toms exactly where you want them. For example, assuming you have two toms, you could mount them on a double-tom floor stand directly in front of your snare. Or you could keep one on the bass drum and put the other on a snare stand, or fly it off of a cymbal stand. Or you could splurge and keep both of the toms where they were on the bass drum, and add a third tom in front of you. You have plenty of options that will allow you to play the toms and your bass drum comfortably.
If you still want the bass drum to face straight forward (perhaps for visual reasons), you should consider angling your body slightly to one side or the other in order to maintain a natural foot-to-pedal relationship. The hi-hat should be positioned in the same manner for the other foot.
Gravity Versus Cymbals
Here’s a simple but undeniable fact: You can’t fight gravity and win. Not for long, anyway. The earth is a lot bigger and stronger than you are, and consequently it can exert a lot more force than you can. The oldest principle of physics is that “what goes up must come down,” and any effort to contradict this principle is going to take a great deal of energy to accomplish. This principle applies to drum kits primarily when it comes to the position of cymbals.
The higher and farther away your cymbals are from you, the more energy it takes to overcome gravity in order to reach up and hit them. Conversely, the lower and closer your cymbals are, the less energy it takes to play them.
This equation is most important when it comes to ride cymbals and hi-hats (including remote hats). Sustaining a complicated or fast ride pattern is hard enough without having to do it on a cymbal that’s shoulder-high or higher. You should make every effort (no pun intended) to keep your ride cymbal and/or hi-hat at a level that minimizes tension or strain in your arm. Under most circumstances, the human arm works best for this purpose when held comfortably at the side of the body, with a more or less 90-degree bend at the elbow. I realize that the location of drums on the kit may make this precise position impossible, but the closer you can come to it, the more endurance you will have. This, in turn, will help you maintain solid time and a better groove over the course of a long performance. (By the way, this applies to the height of your snare drum as well as your ride cymbal.)
In addition to height, cymbal angle is also important. Ideally, your drumstick should be able to strike the cymbal from as close to a parallel plane as possible. That means that if the cymbal is absolutely horizontal, you should be able to comfortably hold the stick horizontally above it. If the cymbal is angled, you should be able to angle the stick to the same degree just as comfortably.
Crash cymbals aren’t played as often as rides and hi-hats, but they generally must be struck with more force. So it’s very important to keep them within a comfortable reach. They should also be angled in such a way that your wrist doesn’t have to go into unnatural contortions to connect the shoulder of the stick with the edge of the cymbal. Acute angles are generally good only if you want to minimize stick impact (such as on a very soft jazz gig), since it becomes almost impossible to do anything but glance off the cymbal with a stick tip.
The Snow Globe Concept
With all of the foregoing in mind, there’s an easy way to determine the optimum placement of drums and cymbals on your kit. I call it the “snow globe” concept.
Start by sitting on your drum stool in an open space. Put your arms out straight to your sides, and then raise and lower them until you’ve outlined a circle. Next, spin around on your stool, doing the same thing over and over again.
Now you’ve created an imaginary “sphere” around you — as if you were sitting on the inside of a giant snow globe. It’s my contention that everything on your kit should be positioned as though it were on the surface of this imaginary sphere. In that way, you should never have to lean or stretch to reach anything.
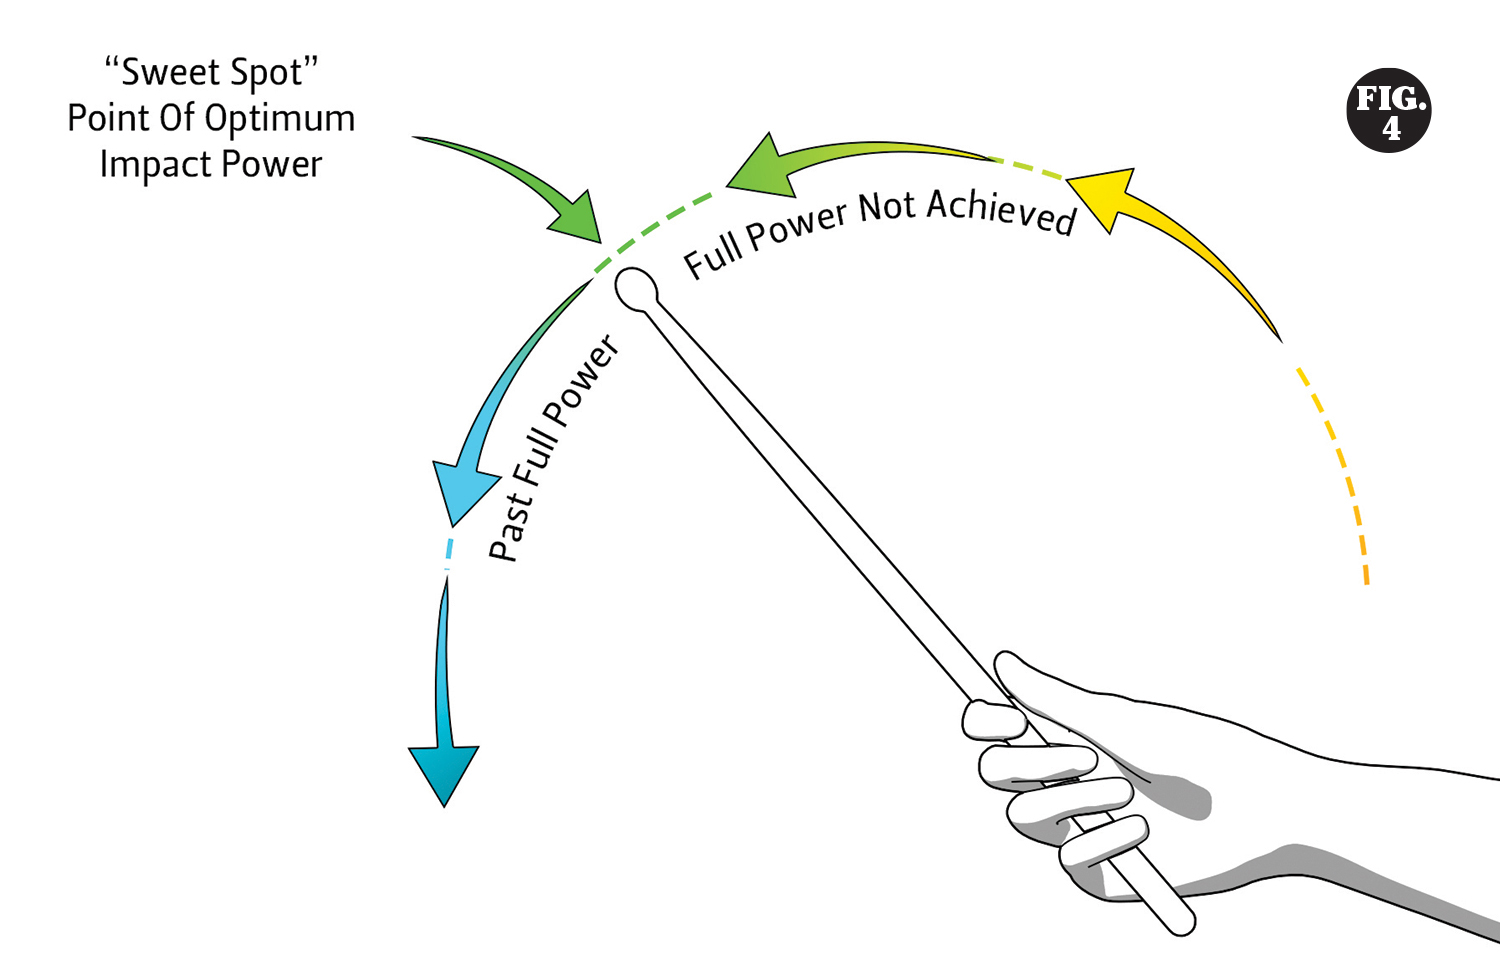
When it comes to rack tom placement, there are both musical and physical factors to consider. Let’s start with the physical factors. In sports like baseball, tennis, and golf, there’s something called a “sweet spot.” This is the point in every player’s swing where the bat, racket, or club impacts the ball with the most power. Hit the ball before that spot and that power isn’t fully developed; hit it after that spot and the power is already diminished.
There’s also a sweet spot in every drummer’s stroke. It’s pretty easy to find; just “air drum” with a stick in your hand and you can usually feel exactly where you’re generating the most impact force. Ideally that’s the point at which you want the tip of your stick to connect with the drumhead (Fig. 4).
Now let’s combine that with an important musical factor, which is that a drumhead responds best when it’s struck at 90 degrees to its surface. That is, straight down into the head, as opposed to a glancing blow (Fig. 5).
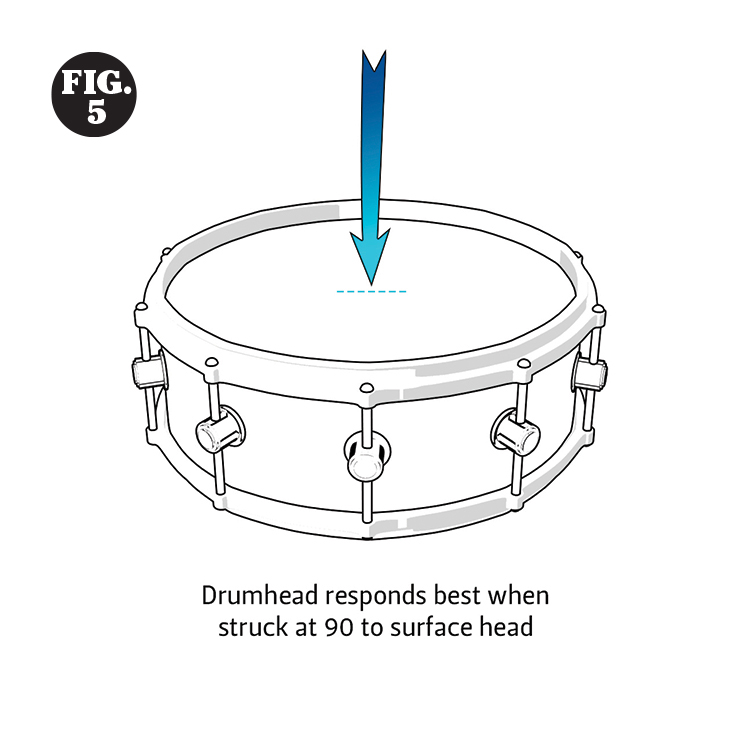
To achieve this striking angle, the drumstick should approach the head as parallel as possible to its surface. This allows the tip of the stick to come straight down into the head. As with a ride cymbal, if the drum is flat, the stick should be flat above it; if the drum is tilted, the stick should match that tilt (Fig. 6).

So, putting this all together, here’s how to determine the optimum placement for your rack toms: Sit behind your snare and bass drum. Holding your sticks as you normally do, raise your arms up and forward naturally. Note the height and angle of your sticks as you reach a point where the sweet spot of your stroke puts the tips of your sticks where they can strike a tom at 90 degrees to the head. That’s the height and angle at which the rack toms should be positioned.
To position your crash cymbals, simply continue raising your arms up (still holding your sticks), and extend them out a bit to either side of the kit. This gives you an idea of the optimum height and angle for your crashes, as well as any other items that you might want to place on your kit.
The Snow Globe concept is especially useful on large setups, where there might be a temptation to place things out of optimum reach just to get them on the kit. But the concept is every bit as applicable to smaller kits. The idea is to achieve optimum playing efficiency and comfort, which should be your goal no matter what size kit you play.
In Conclusion
The object of raising all of these points is not to try to tell you how you should set up your drum kit, or why you should change your concept to suit mine. The truth is, there is no right or wrong way to set up a kit.
Consider the setups of great drummers like Billy Cobham, Simon Phillips, and Carter Beauford, who play open-handed to avoid crossing their hands to play hi-hat patterns, and who put their rides on the left side as well. Then there’s Mike Mangini’s mirror-image tom arrangement, which serves physical as well as musical purposes for him. And finally there’s Bill Bruford, who uses a symmetrical setup with toms on his left and right and his hi-hat directly in front of him in the middle of his kit!
While these “alternative” setups certainly do address some ergonomic issues, I’d only recommend exploring them after you’ve gotten used to the traditional approach, and you feel the need to refine your setup a bit more.
My hope is that the suggestions presented in this article will get you thinking about the critical relationship that exists between your body and your instrument — and the work that the two do together that ultimately comes out as “drumming.” An awareness of the ergonomics of drumming should help you keep that relationship harmonious for many years to come.