From DRUM! Magazine’s November 2016 Issue | By John Lamb
One of the most dangerous myths is that “it’s all in the wrist.” We’ve heard it repeated in athletic activities from tennis to fly fishing. As with most persistent myths, there’s some truth to it. The wrist and fingers (otherwise known as the hand) provide the finishing touch on almost any movement of the arms, from a baseball pitch to a fencing parry.
The wrist myth is dangerous because it can steer you in the wrong direction. We all do whatever we think is best to achieve our goals. If you think pushing the drumsticks into the drums will produce the best sound, then that’s exactly what you will do, whether or not it’s actually true. If you think curling your toes when you operate the pedals gives you a little extra push, then you’ll curl them. [Editor’s note: Don’t curl them!] If you believe “it is all in the wrist” then you will do your darndest to make it be so.
The only way to change it is to learn to believe something different. It’s only common sense that your movement will be better when you sufficiently understand the mechanics of moving — how you are built, how drums work, and the relevant laws of physics. But don’t just take my word for it. In The Scientific Basis Of Body Mapping, T. Richard Nichols, Ph. D., the Chair of Applied Physiology at Georgia Tech University explains: “If movement is based on an inaccurate knowledge or perception about the anatomy of the body, then pathological changes can result. These practices can lead to alterations in cortical representation, which can then become reinforcing of the faulty motor practice.”
Translated, this means that if you move according to a misunderstanding of your structure, then movement quality will suffer. Not only that, but your brain will actually change to reflect your misunderstanding, causing greater problems down the line.
There’s an old teaching principle in which the student should simply do what the teacher says — a concept that works very well for some students, but not for all. Most learners need to know how and why things work in order to learn effectively. Copying a teacher’s movements is an important aspect of learning to play the drums, and yet students develop faster when they also understand why the teacher does what he or she does. This provides students with the knowledge to fine-tune their technique more effectively, and transfer what they’ve learned to new techniques and situations.
There isn’t a “correct technique,” by the way. A lot of choices work, although many are neither safe nor effective. Understanding how the body works will help you determine which is which.
About The Wrist
The wrist is a complex structure made up of eight bones (Fig. 1). It does a lot, bending up and down like a hinge, and turning the hand from side to side. It will even extend longer when needed. As amazing and complex as it is, it doesn’t do everything, nor would you want it to. To develop effective technique, we need to understand and value the information available to us about the whole arm and body, and not just focus on the hand.
Fig. 1: A cross section of the wrist
No Wrist Is An Island
The body is designed to work as a whole. It’s a matter of simple physics. The hand accepts the energy generated from the rest of the body and transfers it through the stick and into the drums in all of the most effective techniques. The hand simply provides the finishing touch of the overall movement. Even finger technique (driven by muscles in the forearm) can use power from the rest of the body. If you try to play your best, why not enlist your entire body for each stick stroke? Isolating movement to only the wrist decreases the total amount of energy you can generate, and disallows any form of combination strokes.
Isolating movement is dangerous from a health perspective, too. Isolated wrist movement makes it move too much, adding unnecessary stress that can lead to wrist damage. Consider Newton’s Third Law Of Motion: For every force applied there is an equal and opposite force. In other words, when you attempt to use only your wrist while drumming, the force of the movement ripples back through your body, which then accommodates the movement.
Natural movement allows this reverse reaction to flow into the floor. However, if you fix your arm in place to isolate the movement at your wrist, your own effort must be used to quell this reaction. It’s not only a waste of energy to stifle a natural and effective movement, it creates health problems. The structures of your body begin to wrestle with themselves, setting up dangerous patterns of tension that can ratchet up over time and contribute to tendinitis, tendonosis, carpal tunnel syndrome, thoracic outlet syndrome, and more.
Fig. 2: Arm muscles in the back stretch from hip to head. All of these muscles move the elbow.
The Hand Is Where The Wrist Is
Another commonly held misunderstanding involves the location of the wrist itself. If I asked you to show me your wrist, you’d most likely point to the bony bumps just before your hand, where you keep your wristwatch. Those bumps, however, are not the wrist, but the end of the radius and ulna. The wrist itself is located in the base of the palm. If you play congas and are familiar with the terribly named “heel-toe” movements, the “heel” comprises the bones in the wrist and the “toe” is the fingers. Understanding the structure correctly can help you learn this otherwise confusing technique much more easily.
Order Of Operations
When we see the wrist moving around, we naturally think the movement originates from the wrist. This assumption is built in to the way the brain perceives things: The brain is built for storytelling, and to our minds, objects move of their own volition. Naturally, we see the wrist moving and assume it’s moving itself. However, the wrist moves because of structures farther up, such as the elbow, the collarbone, the spine, or the legs. If the wrist moves, you see the result in the fingers. If the elbow moves, you see the result in the wrist, as well as the fingers.
You often run into this same kind of mistaken assumption when people talk about the “elbow pumping motion.” While the elbow does move around, it’s the shoulder — powered by muscles that stretch from hip to head — that creates the motion (Fig. 2). Like the wrist, the elbow can’t move itself.
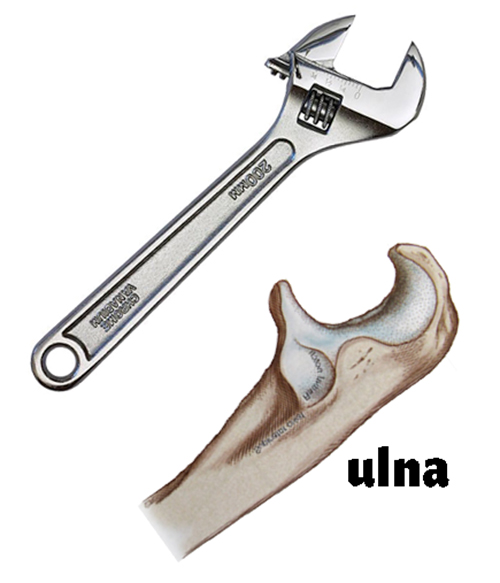
Fig. 3: The ulna’s shape is much like a wrench, allowing it to form a hinge joint with the upper arm.
A Turn Of The Wrist
We commonly say “turn your wrist,” even though the wrist can’t turn by itself. If you don’t believe me, try it! Sit at balance in front of a table just above waist height. Place your forearm on the table so that the tip of the elbow and the back of the hand touch the tabletop. Try to turn your hand over without allowing your forearm bones to move. It might be helpful to feel your forearm bones with your other hand to see whether or not they move.
You aren’t able to rotate your wrist because the rotation happens further up the arm. Both shoulder joints can rotate, but most of the wrist rotation comes from the elbow. It’s okay if that last sentence comes as a surprise to you — it shocked me when I learned it, too. Skipping the important contribution of the shoulder, let’s dive into the design and function of the elbow.
The elbow is where the upper arm bone (humerus) meets the two lower arm bones: the radius and ulna. The joint between the upper arm and the ulna comes first, and is the one people think of as the “elbow” (Fig. 3). It works like a door hinge, swinging back and forth. Looking at the shape of the connection, you can see why. Movement at this joint lets you to bend your arm and straighten it out, allowing you to touch your right shoulder with your right hand, among other things.

Fig. 4: The elbow functionally has two joints: a hinge joint and a pivot joint.
We turn the wrist by using the other forearm bone: the radius, which is a smaller bone that widens at the wrist. The radius connects to the upper arm bone at a pivot joint that allows it to rotate while the ulna remains still (Fig. 4). When the radius pivots across the ulna, the rest of the forearm moves over (Fig. 5). The bones are parallel when your palms face up. When your palms face down, the radius crosses over the ulna (Fig. 6).
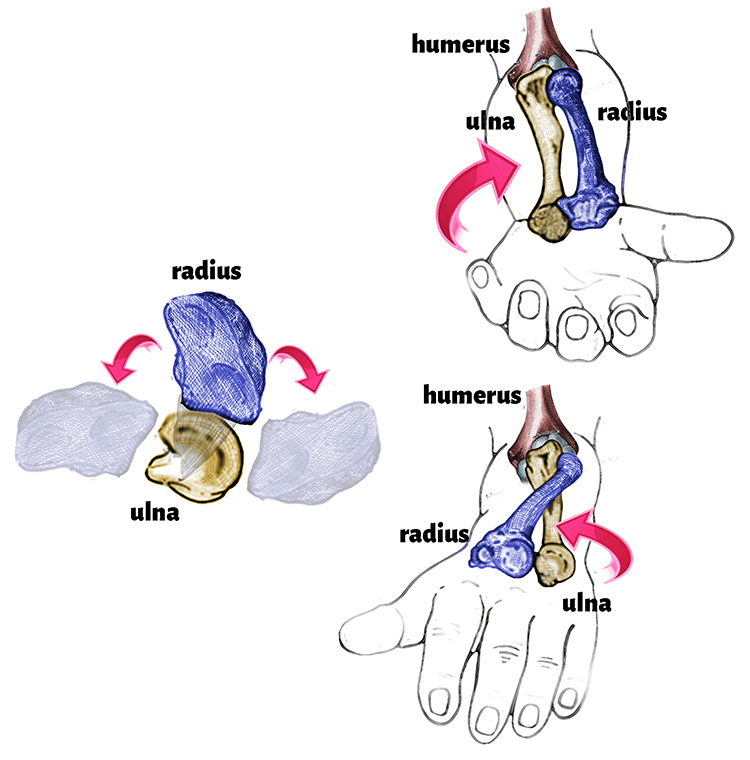
Fig. 5: Turning of the wrist is accomplished in the elbow where the radius pivots across the ulna.
It’s easy to imagine that the two arm bones rotate around each other, twisting like a rope, but they don’t. The ulna can’t rotate at all because it’s locked to the upper arm bone with its hinge joint, which doesn’t allow for rotation. Rotating the ulna would be like trying to rotate a door. The only way the ulna can rotate is if the shoulder joint rotates the entire upper arm or the sternoclavicular joint rotates the entire shoulder.
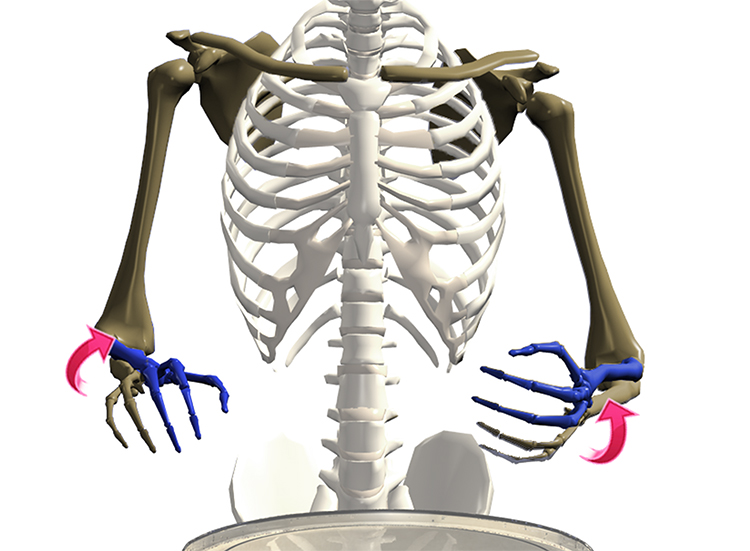
Fig. 6: Another image of the radius (in blue) pivoting across the ulna
Because this rotational movement is so essential for drummers, it’s important to have a complete and accurate understanding of this joint. The axis of rotation of the forearm lies between the tip of the elbow and the pinky and ring finger knuckles (Fig. 7). The width of the radius allows for the rotational movement to have extra power.
Trying to move the ulna around the radius results in a significant loss of power and a lot of extra tension and stress at the wrist. You can find out just how much for yourself: Compare how easy it is to turn your forearm when you imagine the axis of rotation is between the tip of the elbow and your pinky than it is if you imagine the axis is between the tip of your elbow and your thumb.
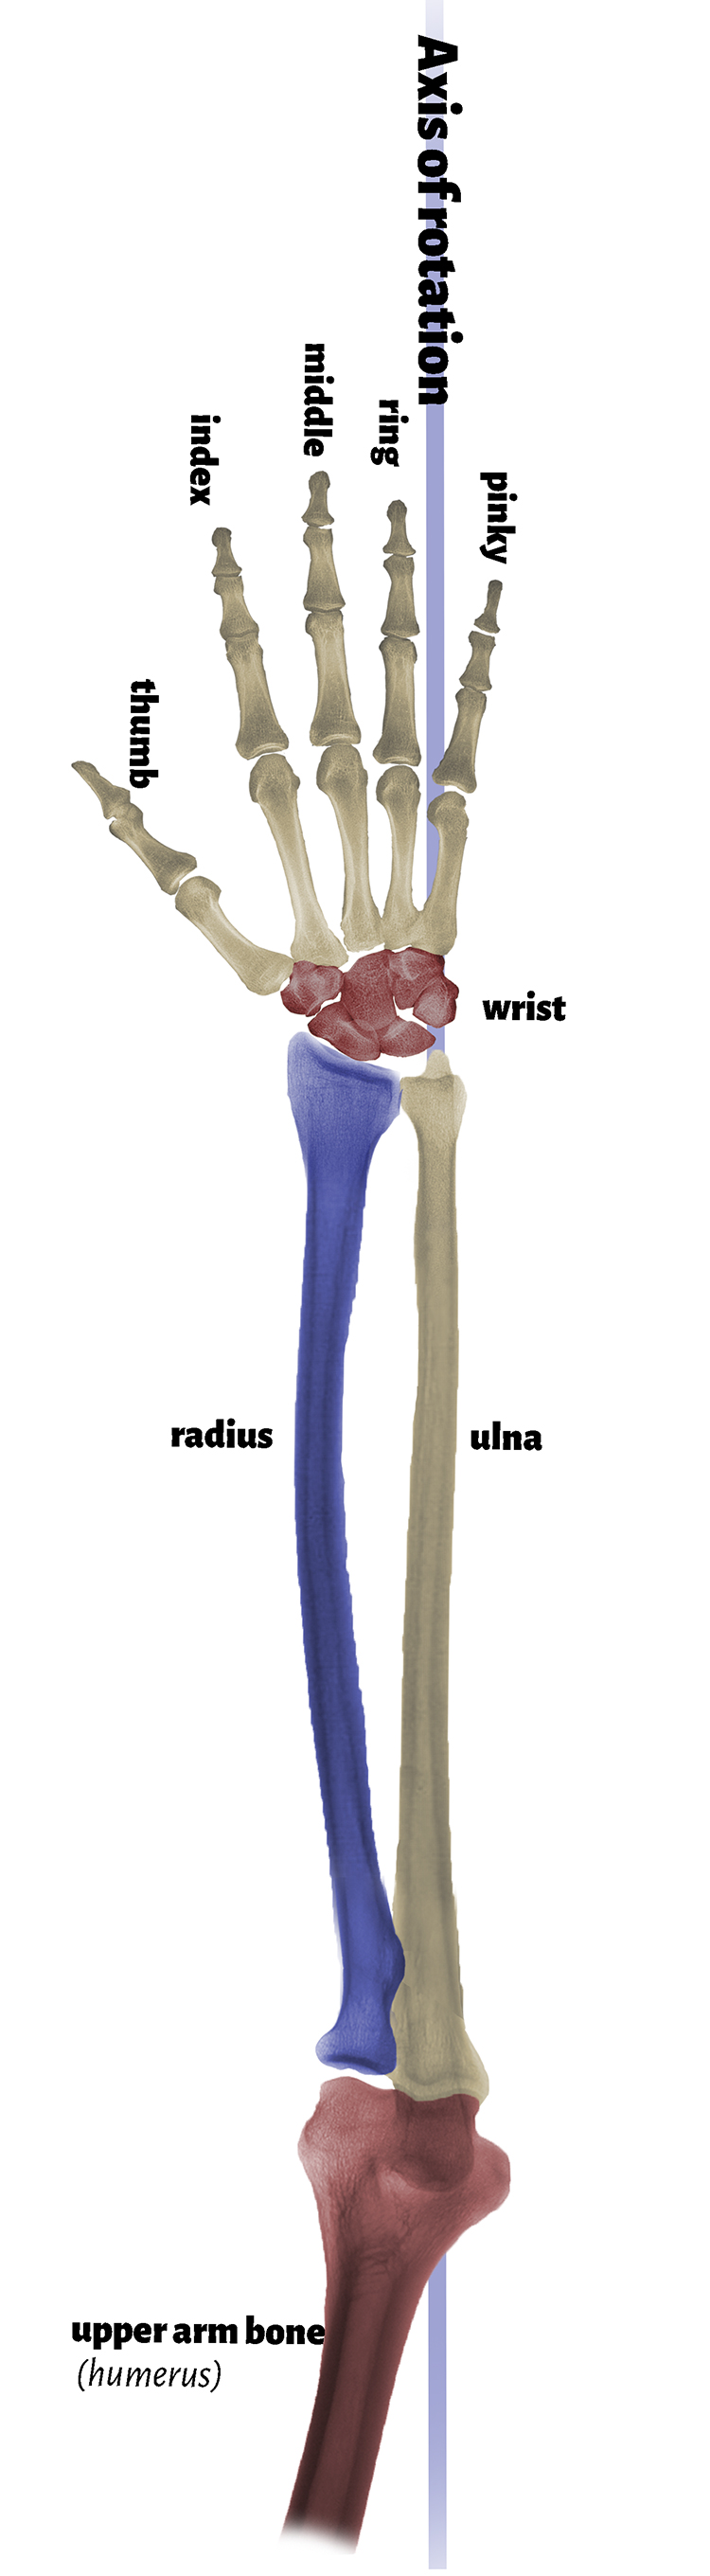
Fig. 7: The ulna creates the axis of rotation of the forearm, and that axis extends between the pinky and ring finger knuckles.
I had a student who was once a fencer on the U.S. National Team, and elbow rotation was a revelation for him. He explained that all the terminology they used while fencing referred to turning the hand over at the wrist, but that trying to turn from the elbow was much easier. He said he wished he’d known this back when he was fencing — he might have won more matches! My drum students often say the same thing when they discover elbow rotation. Once they get used to it they find their playing becomes easier and speed increases.
Powerful Pinky
Drummers should be aware of another important consequence of elbow construction. Muscles create force, and bones transmit that force to push and pull on the world around us. Our two forearm bones set up two different paths for force to travel through the arm (Fig. 8). One lines up along the ulna through the pinky and ring fingers. The other travels through the radius to the middle finger, index finger, and thumb.
Since the ulna lines up behind the pinky and ring fingers, these small fingers have access to a lot of power. When we look at the thumb and see that powerful-looking muscle directly adjacent to it, we naturally assume it must be the biggest and most important finger. What the eye misses, however, is that the pinky doesn’t require its own muscles because it has the power of the arm behind it.
Imagine hanging by one arm on the playground monkey bars. Now imagine lifting your thumb and index finger off the bar. Not a problem, right? Now imagine lifting your pinky and ring finger off instead. If you were to try this (and we don’t recommend that you do), you would lose the support of the largest arm muscles, and hanging would become difficult to impossible.
Hanging from monkey bars uses what is called “power grip” (Fig. 9) It’s what humans naturally use when they need to pick up something heavy. We use “precision grip” when we need to pick up a small object. The classic example of precision grip is how we hold a pencil or pick up a penny.
Power grip mostly uses the ulnar side (signified in yellow). Newborn babies use only the ulnar side. We’ll call this side the power side. It isn’t until later that they learn to use both together. Precision grip mainly uses the radial side (blue). We’ll call this the precision side.
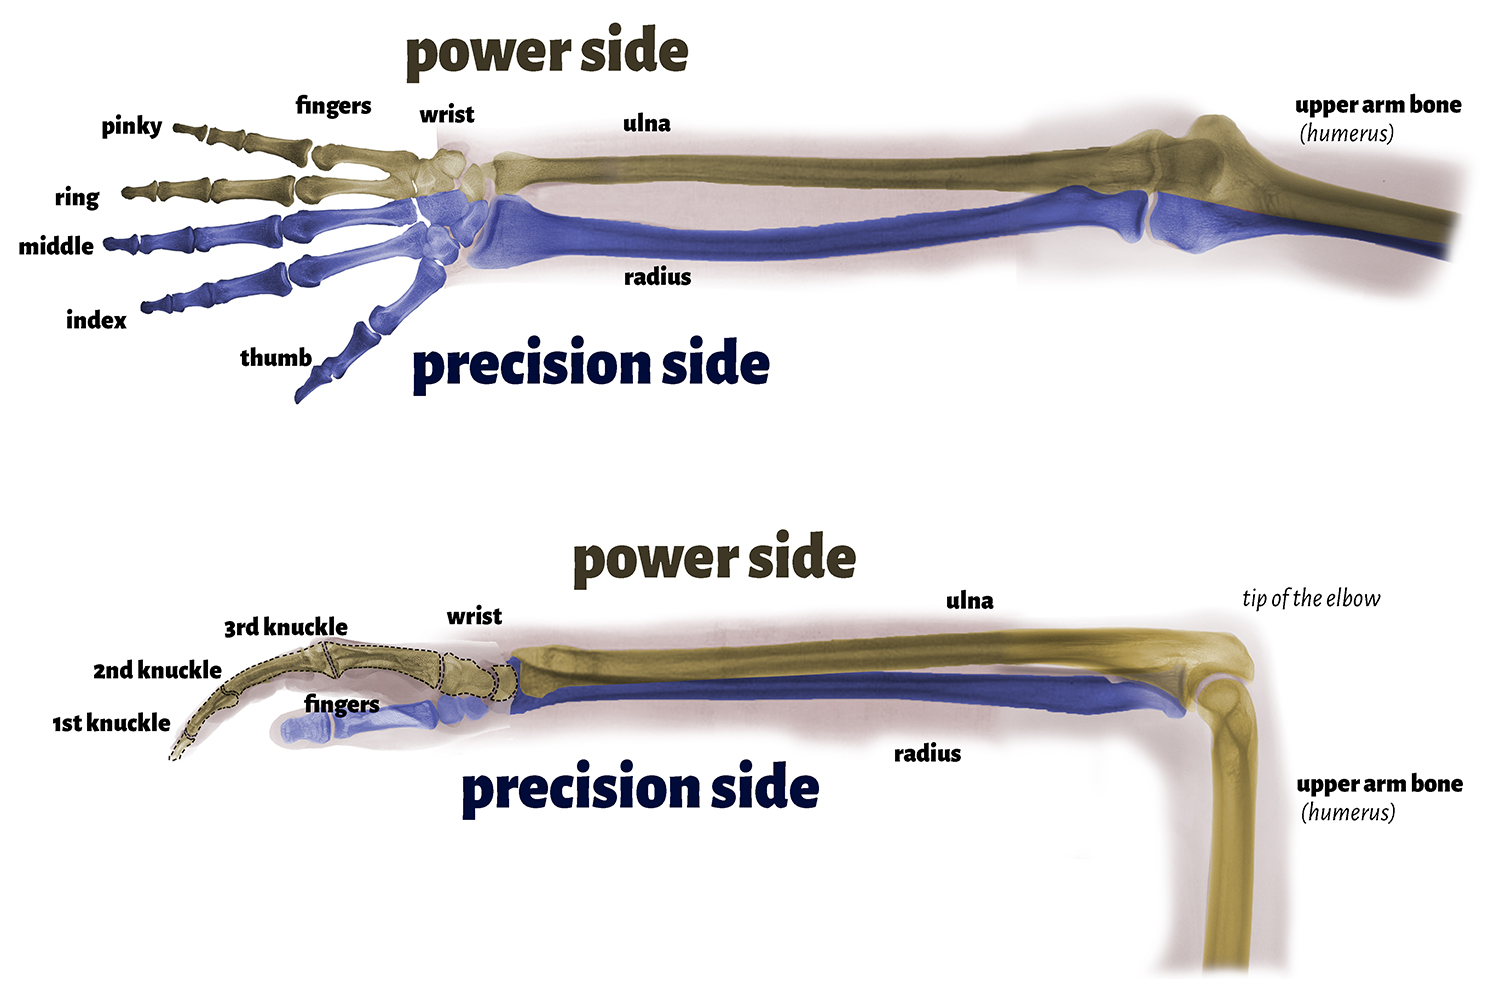
Fig. 8: The two forearm bones set up two paths for force to travel through the arm.
Both are important in drumming, and most techniques use both. Some grips heavily favor one side over the other, though. Moeller grip, for example, affords massive power at the cost of some finesse, while French grip gives up some power to facilitate delicate playing.
No matter the grip, a smooth, natural stick stroke delivers the force generated from the upper arm into the ulnar side before transferring to the radial side (Fig. 10). This sequence is true in any sport: you can see this movement in Drew Storen’s baseball pitching and Stephen Curry’s basketball shooting. The order of movements is built into the design of the arm: As the wave propagates outward, it passes through the ulnar hinge joint before it gets to the radial pivot joint.
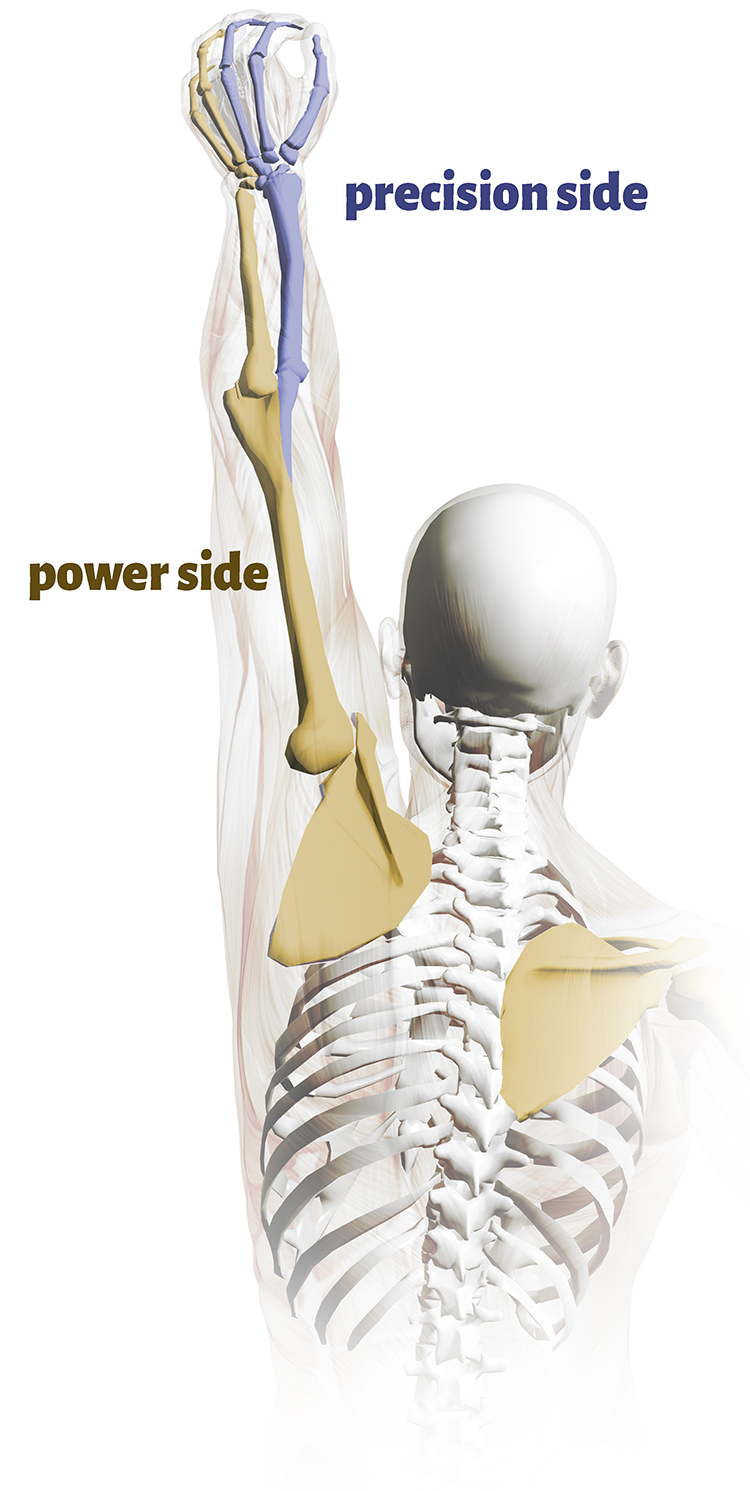
Fig. 9: The bones on the power side, (in yellow) make a direct connection to the rest of the skeleton, while the precision side curves around behind the thumb.
Some techniques switch between the power side and the precision side. Most four-mallet grips do this in one way or another. Marimbist Leigh Howard Stevens’ grip holds one mallet on the power side and the other on the precision side. Vibraphonist Gary Burton’s four-mallet technique allows him to move only one mallet at a time. He holds one mallet near the axis of rotation, so it moves when he bends his wrist or elbow, but not with rotation. His other mallet is off to the side so that it moves with rotation, but not when he bends his wrist.
Split hand technique in hand drumming involves rotating from one side of your fingertips to the other. However, in neutral position, the power side is in the center of rotation, so it won’t move unless you bend your wrist. In split hand technique this is usually accomplished by aligning the middle finger with the ulna. This technique is very similar to standard tremolo technique on the piano and some guitar picking techniques.
Neutral Wrist
In the neutral “home” position, the ulna lines up with the pinky, ring finger, and the pisiform (which is on the ulnar side of most mammals), and carries the least amount of tension. But split hand drumming technique requires the hand to be out of neutral position, which compresses the pinky side of the wrist. After continued play, it can create stress in the wrist and wear it out. However, if you don’t use this technique constantly, and return to neutral position when you finish the passage, you can avoid such problems.
I often see this same issue in stick technique. Many drummers chronically bend their wrists in a similar way to deliver force through the radial side. Like split hand technique, you shouldn’t experience problems by using this movement only when you need it. Unfortunately, many drummers habitually bend their wrists when they play, which can lead to overuse injuries and reduce facility. It’s more effective to allow the strength from the power side to flow through the radial side.
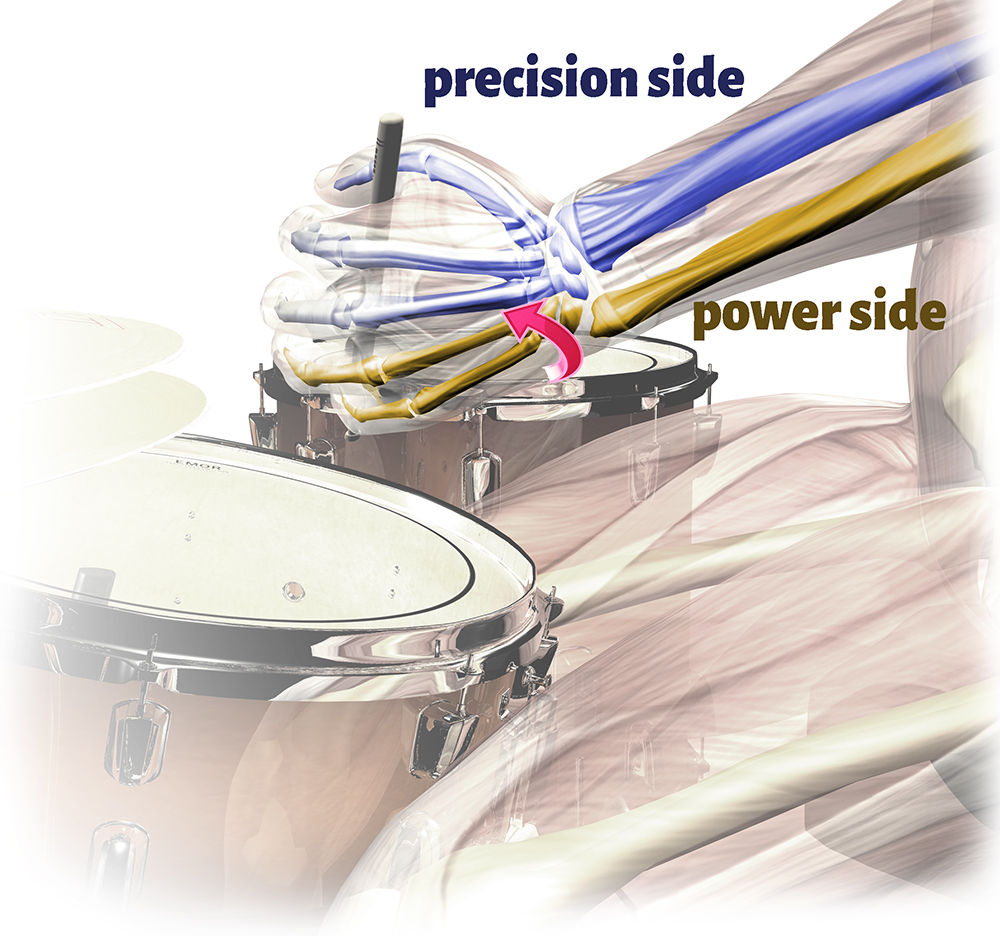
Fig. 10: The precision side rotates around the power side.
Knowledge Is Power
If your understanding of the body is accurate and adequate for what you do with it, then your movement, based on that understanding, would be effective and efficient. If your understanding is a little off, then your movements will be a little off. Think of Christopher Columbus. He sailed west, thinking the world was much smaller than it was and ended up somewhere he didn’t expect. This is the main reason I wrote the book Anatomy Of Drumming, from which this article is adapted. Correcting, expanding, and refining our mental maps of how we are built and the way systems work will lead us directly to better technique and better results.
This article is adapted from Anatomy Of Drumming: Move Better, Feel Better, Play Better.