If you want to capture a high-quality drum recording, you’ll need some good equipment, know how to use it, and how to set up your drum set. The more you know about the recording process for drums, the better off you will be. This article will cover what you need, how to prepare your drum set for the recording studio, and how to approach drum recording professionally.
Step 1: Equipment you need to record drums
Before we start talking about how to prepare your drum set for the recording studio, let’s talk about equipment. Your main gear, except drums of course, will be: computer, audio interface, microphones and preamps.
You will need to record drums with an audio interface, an external device that converts microphone and instrument signals into a format your computer and software recognize.
The number of inputs should match the number of microphones you have. However, even if you have just 2-3 mics, you should get the audio interface you can use in the long run. If you plan to keep doing it in the future, you really shouldn’t be looking for anything under 8 inputs since the more mics you have for recording drums, the better.
There are many different types of microphones to choose from, but the most common ones used for drum recording are dynamic and condenser mics.
Dynamic mics are great for capturing low-end frequencies and rejecting external noise, whereas condenser mics have a wide frequency response and deliver the pristine audio quality, but they’re usually more expensive than dynamic mics.
You’ll mostly use dynamic mics to capture the low end of your drum set and condensers to capture all the subtleties and nuances of your drums. If you want a top-notch sound, you should choose some of the best drum mics for recording since it’s a vital part of your equipment.
Another piece of equipment that’s essential for good recordings is the preamp. A good preamp will take your weak analog signal from the microphone and amplify it in order to create a strong, clean audio signal before sending it to your recorder or interface. The preamp offers you control over each parameter on every channel: gain, panning, high pass filter (HPF), low pass filter (LPF), etc.
There are two basic approaches to recording drums:
The first is to record each drum individually using separate microphones. This technique usually gets better sound because each microphone can be carefully positioned and adjusted for optimal sound for that particular drum or cymbal.
The second approach uses fewer microphones and simply records the entire kit as one instrument.
Both approaches have advantages and disadvantages, but we’ll be focusing on the first approach here since it will require more preparation work.
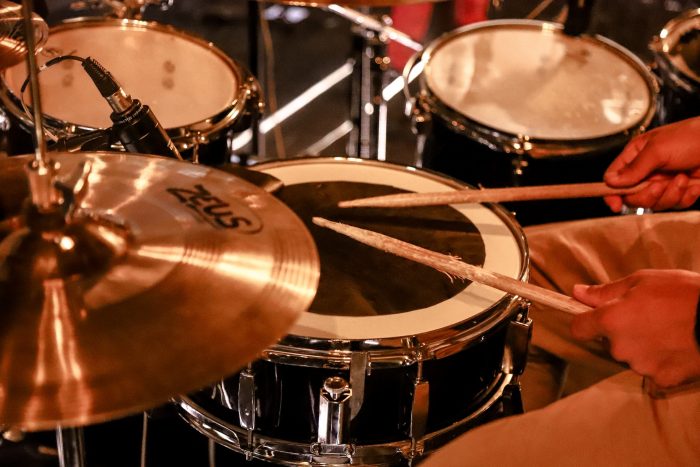
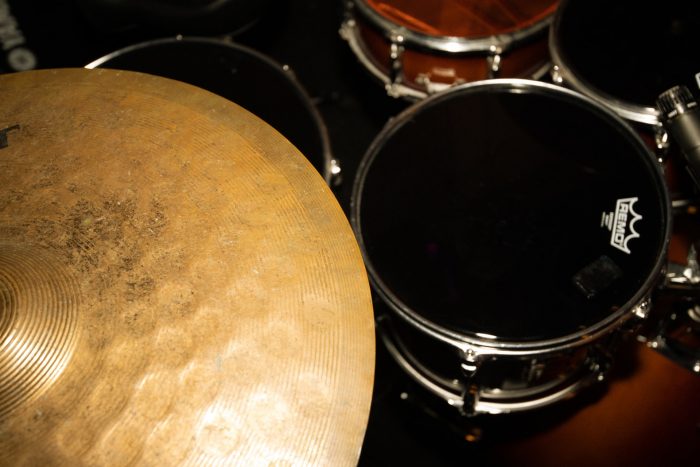
You will need microphones, microphone stands, and cables for drum set recording. The number of microphones you need depends on how many drums there are in a kit. Let’s say that we have a drum kit with a kick drum, snare drum, four toms, two overhead microphones, one room microphone, and one hi-hat microphone. We need nine microphones in total.
It’s still possible to record drums with two or three microphones in your collection. However, it would be nice if you had some extra microphones so that you could try different positioning until you find the best sound possible. For example, if we have more than one kick drum microphone, we can place one inside the kick and one outside and later decide which sound fits better into the track.
When it comes to stands and cables, it’s always good to have more than enough of them so that you can experiment with different positions for mics. You never know where that great sound might be hiding!
Step 2: Learn your drum parts
You have to know what you’re doing before you walk into the studio. You can get away with sloppy playing at rehearsals and live shows, but that won’t fly at the studio. The first step in having the best-sounding drums is to spend time learning your drum parts. You should be able to play them effortlessly so that you can deliver optimum performances in the studio.
Besides knowing how to prepare your drum set for the recording studio, you need to practice as much as possible and ensure that every part is perfect before you step behind the kit. You don’t need to over-rehearse, but it’s a good idea to know what you’re going to do when you first sit down at the kit. This will allow you to experiment in the studio without worrying about whether or not what sounds good on paper will translate well in real life.
You have to know what you’re going to play, and not just for your own sake. If you’re playing with a band, you need to learn the songs in order to play them well. You may also need to adjust your part if you’re working with a producer or engineer who has an idea of how the drums should fit into the overall production.
Step 3: Drum recording setup
A great way to begin recording an album is with a basic recording setup on your drum set. Setting up a drum kit is one of the most important yet tricky things for any sound engineer. If you don’t have experience, you may be making things more difficult for yourself than necessary. We will take you through the steps for a drum recording setup and you will know how to prepare your drum set for the recording studio.
1. Mic up the snare, kick, toms and cymbals. The more mics – the better!
2. Make sure you’re getting good levels on your preamps and that there’s enough distance between the mics, so they’re not phasing with each other.
3. Once you get the levels right, you can start experimenting with different mic placement patterns and sounds in order to get the tone that suits your song best. You can also use an overhead mic if it helps capture a better sound overall or adds ambience that fits with what’s happening in your recording session (e.g., if there’s a lot of ambient noise in the room).
4. Make sure all mics are connected properly before starting recording sessions!
When setting up drums, the first thing to consider is how the different instruments should be arranged relative to each other. If you want your instruments close together, make sure that they don’t overlap and cause conflict in the recording.
If the instruments aren’t going to overlap, then they need to be far enough apart that they don’t interfere with one another during playback. That’s why it’s important to use a mixer and/or preamp that has enough inputs, so each instrument has its own channel (or at least its own audio track).
One of the most important parts of creating a studio-ready drum sound is tuning. You can tune your drums in a few easy steps, but keep in mind that tuning the drums for recording is more complex than usual. You need to tune each individual element of your kit in a way that will work with every microphone you’re going to use.
The best way to think about tuning your drums is to remember that the head of the drum is like a speaker: The higher you tighten it, the higher the fundamental tone; the lower you loosen it, the lower the fundamental tone.
Start with the batter head or the head you strike with your sticks for best results. Start at one lug (the thing that holds the head onto the shell), loosen it all the way, then turn it back into place just until it’s snug. Repeat this for all lugs until they are all equally loose, then start tightening each one in succession until you can feel each lug gently pulling against each other.
For the sake of the final quality, you should have the best drum heads for recording.
It’s a good idea to get the new drum heads and replace the old ones before recording, to get a fresh sound. To do it, start loosening all of the lugs on your drum heads to release all of the tension.
This allows you to completely remove and replace both the batter head (the one you hit with a stick) and the resonant head (the one on the bottom). Then, put a new head on the top and bottom of each drum, making sure that they are free of wrinkles and that both heads are positioned in the same way (label-side out, etc.).
Step 4: How to record drums to computer
Now when you know how to prepare your drum set for the recording studio, you need a brief recording techniques guide for getting started. If you are recording in a studio with a professional sound engineer, he will do that part.
However, you don’t need a fancy recording studio to achieve amazing results. You can make incredible sounding tracks with modern software-based recording programs, hardware, and a good ear. If you want to know how to record drums at home, you will need all the knowledge you can get to do it properly.
First, you should know how to record drums on a computer. Besides drums, mics, preamps, and audio interface, you will need computer software for drum recording. You need the right digital audio workstation (DAW) that’s perfect for working with drums. It should have built-in plugins that process each drum track without affecting the others, allowing you to record your drums with ease and then fine-tune each drum sound individually until it’s exactly what you want it to be.
Thankfully there are plenty of Digital Audio Workstations (DAWs) that have drum recording software built into them. Plus, many of these software packages are free or low-cost—meaning you can give it a try before you invest in something more expensive.
Before you even touch the drum kit, make sure your computer’s audio settings are set up correctly with the right inputs and outputs.
Then, connect each piece of your drum kit to an input on your audio interface. Make sure you know where every item is connected and that the proper input is being used for each piece of equipment.
Once everything is connected, it’s time to start recording! You can record a track on its own or in conjunction with other tracks. If you want to hear what your track sounds like while you’re recording, make sure you’ve enabled click track and metronome options in the software. It’s also important to choose a tempo to use as a reference when recording and mixing different tracks together later. If everything sounds good after a few test runs, it’s time for the real thing! Press “Record,” and get playing!
After you’ve recorded all of your tracks, it’s time to do some editing. A digital audio workstation will allow you to edit individual tracks or entire projects as much as you’d like before publishing them or sharing them with others.
Wrap-up
If you are recording studio drums, you will probably use a studio drum kit, and you will not need to know a lot about how to set up your drum set for recording. If you are not in a drum recording studio but you do it at home, you will need to learn as much as you can about the drum recording equipment and software you will use.
The first thing to do if you want to know how to prepare your drum set for the recording studio, is getting the right equipment. This includes microphones, preamps, and an audio interface. Also, your standard drum kit setup will need some drum tuning and positioning, which can be different from the standard drum setup.
If you caught all the recording tips above, you would even know how to make a cheap drum set sound good. And as with all tips, feel free to experiment. You never know – you might just find something awesome.
The 10 Best Recorded Drum Sounds
Purposeful Haze: Re-Create ‘60s Drum Sounds