
Anyone working on a recording can benefit from the sage advice of a seasoned professional — especially when it comes to getting great drum sounds in the studio. With this in mind, we turned to engineer/producer George Borden, Advanced Recording Course Director at Ex’pression College For Digital Arts and studio guru of choice for a multitude of bands pounding through the San Francisco Bay Area underground music scene. Over the years, he’s worked with artists across the spectrum, from The Tubes and The Sons of Champlain to Santa Cruz punkers Fury66 and Leveler.
Be it producing, engineering, or mastering, Borden has plied his studio magic on hundreds of recordings. And he’s inside the music as well, writing and producing compositions for his own projects. For his recent release on Illgenetics, “Fenceposts”, he played all the instruments while engineering and producing the whole thing — no small feat. As a drummer himself and a multifaceted engineer with an acerbic wit, he knows what he wants to hear and how to make it right on both sides of the mike. And to our delight, he agreed to share his drums-in-the-studio modus operandi with us.
PHILOSOPHY
Borden’s philosophy is fairly organic and his approach straightforward: Get the best drum sound possible using informed microphone selection and proper placement. Mikes should be selected for their characteristic response to best represent each element of the drum kit. This means that the mike shouldn’t overemphasize a dominant sonic feature, but should rather enhance less prominent sonic qualities that may get lost in a mix, such as tone from a set of hi-hats, the resonance of a particular drum, or the subtle sizzle of a dark cymbal.
Somewhat of a purist, Borden prefers not to process drum sounds while tracking, advocating minimal equalization and dynamics processing only as necessary during mix down. His view of the drum set is a holistic one, and he feels it is most important to listen to how all the pieces of the kit interact with each other as a whole and within the space. He also believes it is essential to consider how the mikes respond individually and how they work together when combined. Creative use of this knowledge can be a very effective tool in tailoring your drum sound in the studio.
IN SESSION
To get a good take on Borden’s shtick, I followed him around like a fly while he commandeered a couple of sessions. The first was held in the SSL9000 Studio at Ex’pression tracking Tubes drummer Prairie Prince to get some sounds for Borden’s next project. It was during this session that Borden went hog wild with his favorite drum miking approach, duly documented in the following paragraphs. The next session focused on setting up a simpler miking technique to get drum sounds for Bay Area rockers Remora. I took advantage of the leisurely vibe at that session to have Borden expand on some of the finer points of his suggested techniques and to demonstrate one of the more straightforward setups he could conjure up. Here’s the breakdown.
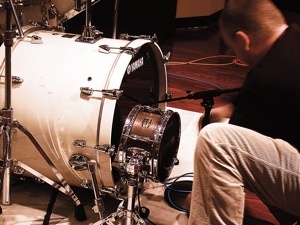
Fig. 1. Borden places an SM57 inside the bass drum and a Subkick on the outside
KICK OFF
We all know the kick drum should have low-end cajones and a solid bite on the attack to cut through a mix. While Borden has used tailored bass drum mikes to achieve this result in the past, these days he favors a Shure SM57 inside the kick to get the bite and a Yamaha Sub Kick just off the front head to give the kick a prodigious amount of low end chutzpah (Fig. 1). The Sub Kick is comprised of a six-inch speaker wired in reverse inside a small drum — this essentially turns the apparatus into a huge microphone that captures major low end. “Never in my life would I have thought I’d use a 57 in a kick until I heard the Sub Kick,” exclaims Borden. “On its own, the 57 would sound rather thin — but it’s great at getting straight beater impact, and the Sub Kick captures insane lows. They’re the perfect complement.”
Call out [mp3: 57 solo / sub kick solo / combo]
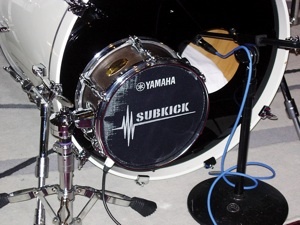
Fig. 2. A Subkick on the outside of the bass drum with an SMS57 on the inside (dynamic duo)
To start, Borden places an SM57 just inside the kick, angled toward the point halfway between the beater and the edge of the drum to capture the attack. He then positions a Sub Kick outside the front head, positioned off center and almost up against the surface of the head (Fig.2). Blending the two sounds together achieves the ultimate kick drum sound. Contrary to the common preference of taking the front head off of the kick drum for a studio session recording, Borden is a fan of keeping the front head on the kick. “It’s a drum,” he says pointedly. “Its tone comes from the interaction of the two heads stretched over the shell, so let it resonate!” To isolate the Sub Kick from extraneous vibrations, Borden often builds a tunnel with layers of packing blankets anchored with gaffers tape between the rim of the bass drum and a chair back (Fig. 3).
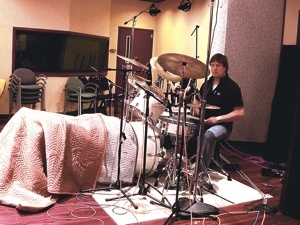
Fig. 3. Full setup with bass drum tunnel (Prairie Prince session)
SNARING THE SNARE
While other engineers go for a mike on the top head and another mike on the strainer to capture a snare sound, Borden goes for simplicity: the classic SM57 on the top head, an inch and a half above the rim of the drum and angled toward the center of the head to capture the attack and tone of the drum. This approach is simple but effective. Other snare mikes can be used to achieve subtle differences in sound, such as the Audix i-5, an Electro-Voice ND408, or the Sennheiser e905 or a clip-on condenser such as Audix’s micro-D, AKG’s C418, or Shure’s Beta98 just to name a few.
HIP HI-HAT
A crisp hi-hat with good tone is essential for presence. Borden prefers to use a Shure SM81 for the hi-hat because to his ears the midrange response characteristics of that mike focus on the tonal quality of the cymbals and give balance to the sonic characteristics of most hi-hats. Hi-hats typically have a sharp sounding aspect and the SM81’s focus on the midrange fills out the sound. “Use the natural response characteristics of a mike to bring out what’s less obvious (such as the midrange resonance of a cymbal) without accentuating, say, the high end on a brash sounding instrument,” he advises.
He cites, for instance, that certain microphones known for having an “airy” top end such as a Neumann or an AKG C414 TLII could potentially overemphasize the sizzle on an overly-bright, brittle sounding cymbal. A mike that accentuates the tone while de-emphasizing the edge on the top end would be a better match. On the other hand, Borden adds, if a cymbal sounds dark or dull, a mike with brighter highs would be perfect to bring out the cymbal shimmer and cut.
TENACIOUS TOMS
The Sennheiser MD421, a dynamic mike renowned for its top end detail and low end pickup, wins Borden’s kudos as a great close tom mike for capturing lots of power and tone for rock music and genres with a harder edge. On jazzier sessions, he’s more apt to reach for an AKG C414 condenser to capture more subtle nuance and detail…a crisp attack on the head and a more open tone from the drum. Some other suggestions for decent tom mikes within budget range include the Shure SM57 or Sennheiser’s e904 on the dynamic side and AKG’s C3000 or C3000 B as well as other condensers from Beyer-Dynamic, Shure, Audix, and other manufacturers.
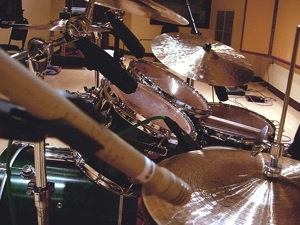
Fig. 4. Close-miking the toms with Sennheiser MD421s and a Shure SM81 on the hi-hat
A standard placement is sufficient to capture the voice of the drum. Position the mike an inch and a half above the rim and angle it at 45-degrees toward the head to capture attack and tone (Fig.4). Pointing the mike more toward the head will accentuate more lows from proximity effect, and pointing the mike more toward the center of the head will capture more stick attack. Adjust the mikes to suit your sonic tastes.
OVERHEAD OVERVIEW
Borden likes to use large diaphragm tube condenser microphones overhead, his current favorite being the Audio-Technica AT4060 tube microphone with the Rode NTKs as a suitable alternative in the same vein. He prefers these tube mikes for their pleasing distortion characteristics which he touts as harmonically musical — a trademark character much extolled in tube gear. The proper placement and use of overhead microphones becomes the “cornerstone of the drum sound,” according to Borden. His favored technique involves a bit of mental exercise utilizing measurement, mathematics, and phase inversion to enhance desirable frequencies and stabilize the stereo image. (See Plugged In sidebar, Fatten Up the Bottom End with Physics, August 2005 issue)
A split pair works best for this approach (SEE Fig.3). Place the two overhead mikes so that they are spaced apart and between four and five feet directly above the snare and floor tom close mikes. As sound travels 1,130 feet per second, you can ascertain the frequency that would be reinforced by phase coherency by dividing this distance by four to five feet. In this case, between 230Hz and 280Hz would be accentuated (depending on the actual distance) because that frequency is perfectly in phase between the close and distant mikes combined.
The range between 230Hz and 280Hz is where things tend to sound muddy. To reduce this aspect and accentuate a full bottom end, simply flip the phase on the overhead mikes so that they cancel out the murky range and reinforce the frequency that’s twice the wavelength and half the originally enhanced frequency — around 115Hz to 140Hz. The relationship between the close mikes and the overheads and the option of phase inversion determine what frequency gets reinforced. Just be sure not to place the mikes too high as you’ll capture too much room sound and can have amplitude issues.
In addition to enhancing the low end, flipping the phase on the overhead mikes actually stabilizes the stereo image and tightens up the sound. As the cymbal shimmer decays, the morphing sound drifts into the other mikes and causes phase shifting between the overhead and the close mikes as they combine to the stereo buss. This smears the cymbal sound across the panned spectrum, affecting the focus of the stereo image. By reversing the phase on the overhead mikes, you can tame this aspect because the murky frequency range would no longer be reinforced.
Call Out [mp3: whole kit w/overheads not phase flipped // whole kit with overheads phase flipped]
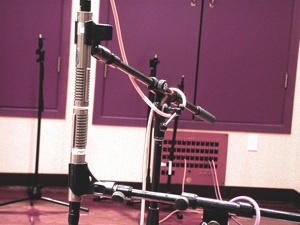
Fig. 5. Two Royer R121 Ribbon mikes are set in a Blumlein array about eight feet in front of the kit and about four feet above the floor
ROCKIN’ THE ROOM
Borden has access to some great studios, so for room miking he’ll often employ a stereo microphone technique called a Blumlein array to take advantage of the nice sounding rooms. The Blumlein approach calls for two microphones with a figure-eight pickup pattern to capture a full room sound along with a mono-compatible stereo image of the direct sound. His current choice for this application is a pair of Royer R121 ribbon mikes in an XY pattern placed about eight feet back in the room in front of the kit about 4 feet or so above the ground (Fig. 5).Borden likes the Royers because to his ears they focus on the “chunkier” parts of the kit.
But if your room isn’t so spiffy, you could employ a stereo pair of large diaphragm condensers sporting a cardioid pickup pattern to capture a balance of the drums in the room without picking up too much of the room sound. A single microphone placed about eight feet back would work well for this purpose too.
A MINIMALIST APPROACH
When asked his opinion on minimal microphone techniques to get a decent drum sound, Borden spoke of Glyn Johns’ popular three-mike technique. Glyn Johns is an engineer renowned not only for this miking strategy, but for his work with the Beatles, the Who, the Stones, and the Eagles among others. His miking approach covers sections of the kit and employs one mike centered over the drum set, another mike off the edge of the floor tom to capture that side of the kit, and a third transducer out in front. Borden modifies this foundation by adding a fourth mike on the kick drum to further focus the low-end impact.
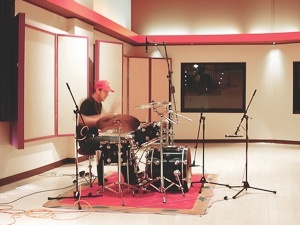
Fig. 6. Lateral view shpring four SM57s on the kit (Remora session)
While condensers are often recommended, any variety of mikes would work. An AKG D112, a Sennheiser e902, a Shure Beta 52, or similar mike could be used to capture the bass drum, and three small or large diaphragm condensers out in front, to the side, and overhead could be used to capture a blend of the kit as a whole. Dynamics should be sufficient also, states Borden.
Experimenting with this concept that just about any mike would do with this technique, we decided to see how four Shure SM57s would fare. During the session setup for the band Remora, drummer Erik Larson agreed to be the guinea pig for our experiment. He tends to hit hard, and these four dynamic workhorses did an amazingly respectable job of capturing his sound (Fig. 6). And the setup cost only about $350 in microphones and took around fifteen minutes to get up and running. Here’s the deal.
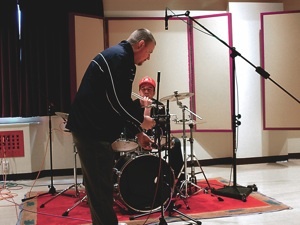
Fig. 7. Borden placing the third SM57 in front of the kit
RING AROUND THE KIT
For the most part, the Glyn Johns approach involves capturing a balanced picture of the kit as a whole by focusing on each quadrant of the radiated sound. Borden set up the first mike about six inches off to the side of the floor tom, raised about four inches above the level of the rim and aimed straight across the drum set toward the hi-hat to capture the floor tom, the ride, and the crash cymbal(s) on that side of the kit. Another mike he placed about four feet directly above the snare, rack tom, hi-hat convergence. This effectively picks up that section of the kit, including the crash. He positioned the third mike out in front of the kit, about three or so feet back, pointing at the area between the kick drum and the rack toms to capture a blend of the toms and the kick (Fig. 7).
The fourth mike he placed so that its capsule was about two inches inside the port of the front kick drum head, aimed between the beater and the edge of the drum in order to focus and fill out the kick drum sound. If you try this approach, adjust the placement of each of the mikes to get the best sound for the situation. The optimum placement depends on the parameters of the room, the quality and configuration of the kit, and the playing style of the drummer. A good drummer and a good room yield the best results. We recorded this setup to ProTools and listened back … We were pleasantly impressed by the overall sound.
Call Out [mp3 — 4 SM57s in a modified Glyn Johns array]
SURVEY SAYS …
All in attendance agreed that the results were reminiscent of that late ’60s to early ’70s natural drum sound. Larson observed that the drums sounded similar to what he’s heard on classic Who albums. “This setup doesn’t focus so much on individual drums as it does the whole kit,” comments Borden. “It also proves that you can still make records with minimal gear. For $350 worth of microphones, you get pretty good coverage and a monocompatible sound that you can still pan to get a decent stereo image. The final result is a natural holistic sound. And the kick drum mike gives stability to the bass drum and solidifies the bottom end.”
So yeah, you could use $15,000 worth of microphones and a world class room with top-of-the-line gear to get a great drum sound, but if money and access were an issue, you could go with a minimal approach in a decent room and experiment with some creative mike placement and still achieve satisfactory, useable results. High-end mikes are the bomb, but even affordable versions and good miking techniques can capture a professional studio sound from your kit. Try incorporating some of these Borden-recommended techniques on your next recording and see what happens!